**WARNING: This will cause a heart attack if you eat it every day. So, don’t eat it everyday. Yay! Happy Independence Day!!**
I need to give credit to the inspiration for this to Jon so you’re welcome if you’re reading this. In two consecutive days he emailed me articles about eating pie for breakfast and then eating a burger for breakfast. Naturally I combined the two in my memory and when reminiscing I came up with… BURGER PIE! Luckily the 4th of July was around the corner so I could use the holiday to hole myself up in my kitchen for a few hours and whip up this uber Americana beauty! The pie dough is an interpretation of Alton Brown’s recipe here but replacing the lard with rendered bacon fat (everyone should hold on to their bacon fat!!).
FYI – This is the first time I made this recipe and I went off of no recipes except for the pie crust. I think I did a pretty awesome job but I think with many additional attempts I/we could make this into something phenomenal. ENJOY.
Pie crust:
- 6 ounces (~1 cup) flour plus extra for rolling
- 1/2 teaspoon salt
- 3 ounces butter chopped and chilled (~6 tablespoons)
- 1 ounce bacon fat chopped and chilled( ~2 tablespoons)
- 1/4 cup ice water in a spritz bottle
- 32 ounces dried beans (or pie weights)
Filling:
- 2 pounds ground beef (any fat content is fine)

- Salt + pepper
- 2 teaspoons cumin
- 1 small yellow onion (any type of onion would work here, whatever you prefer), thinly sliced
- 10 slices applewood smoked bacon
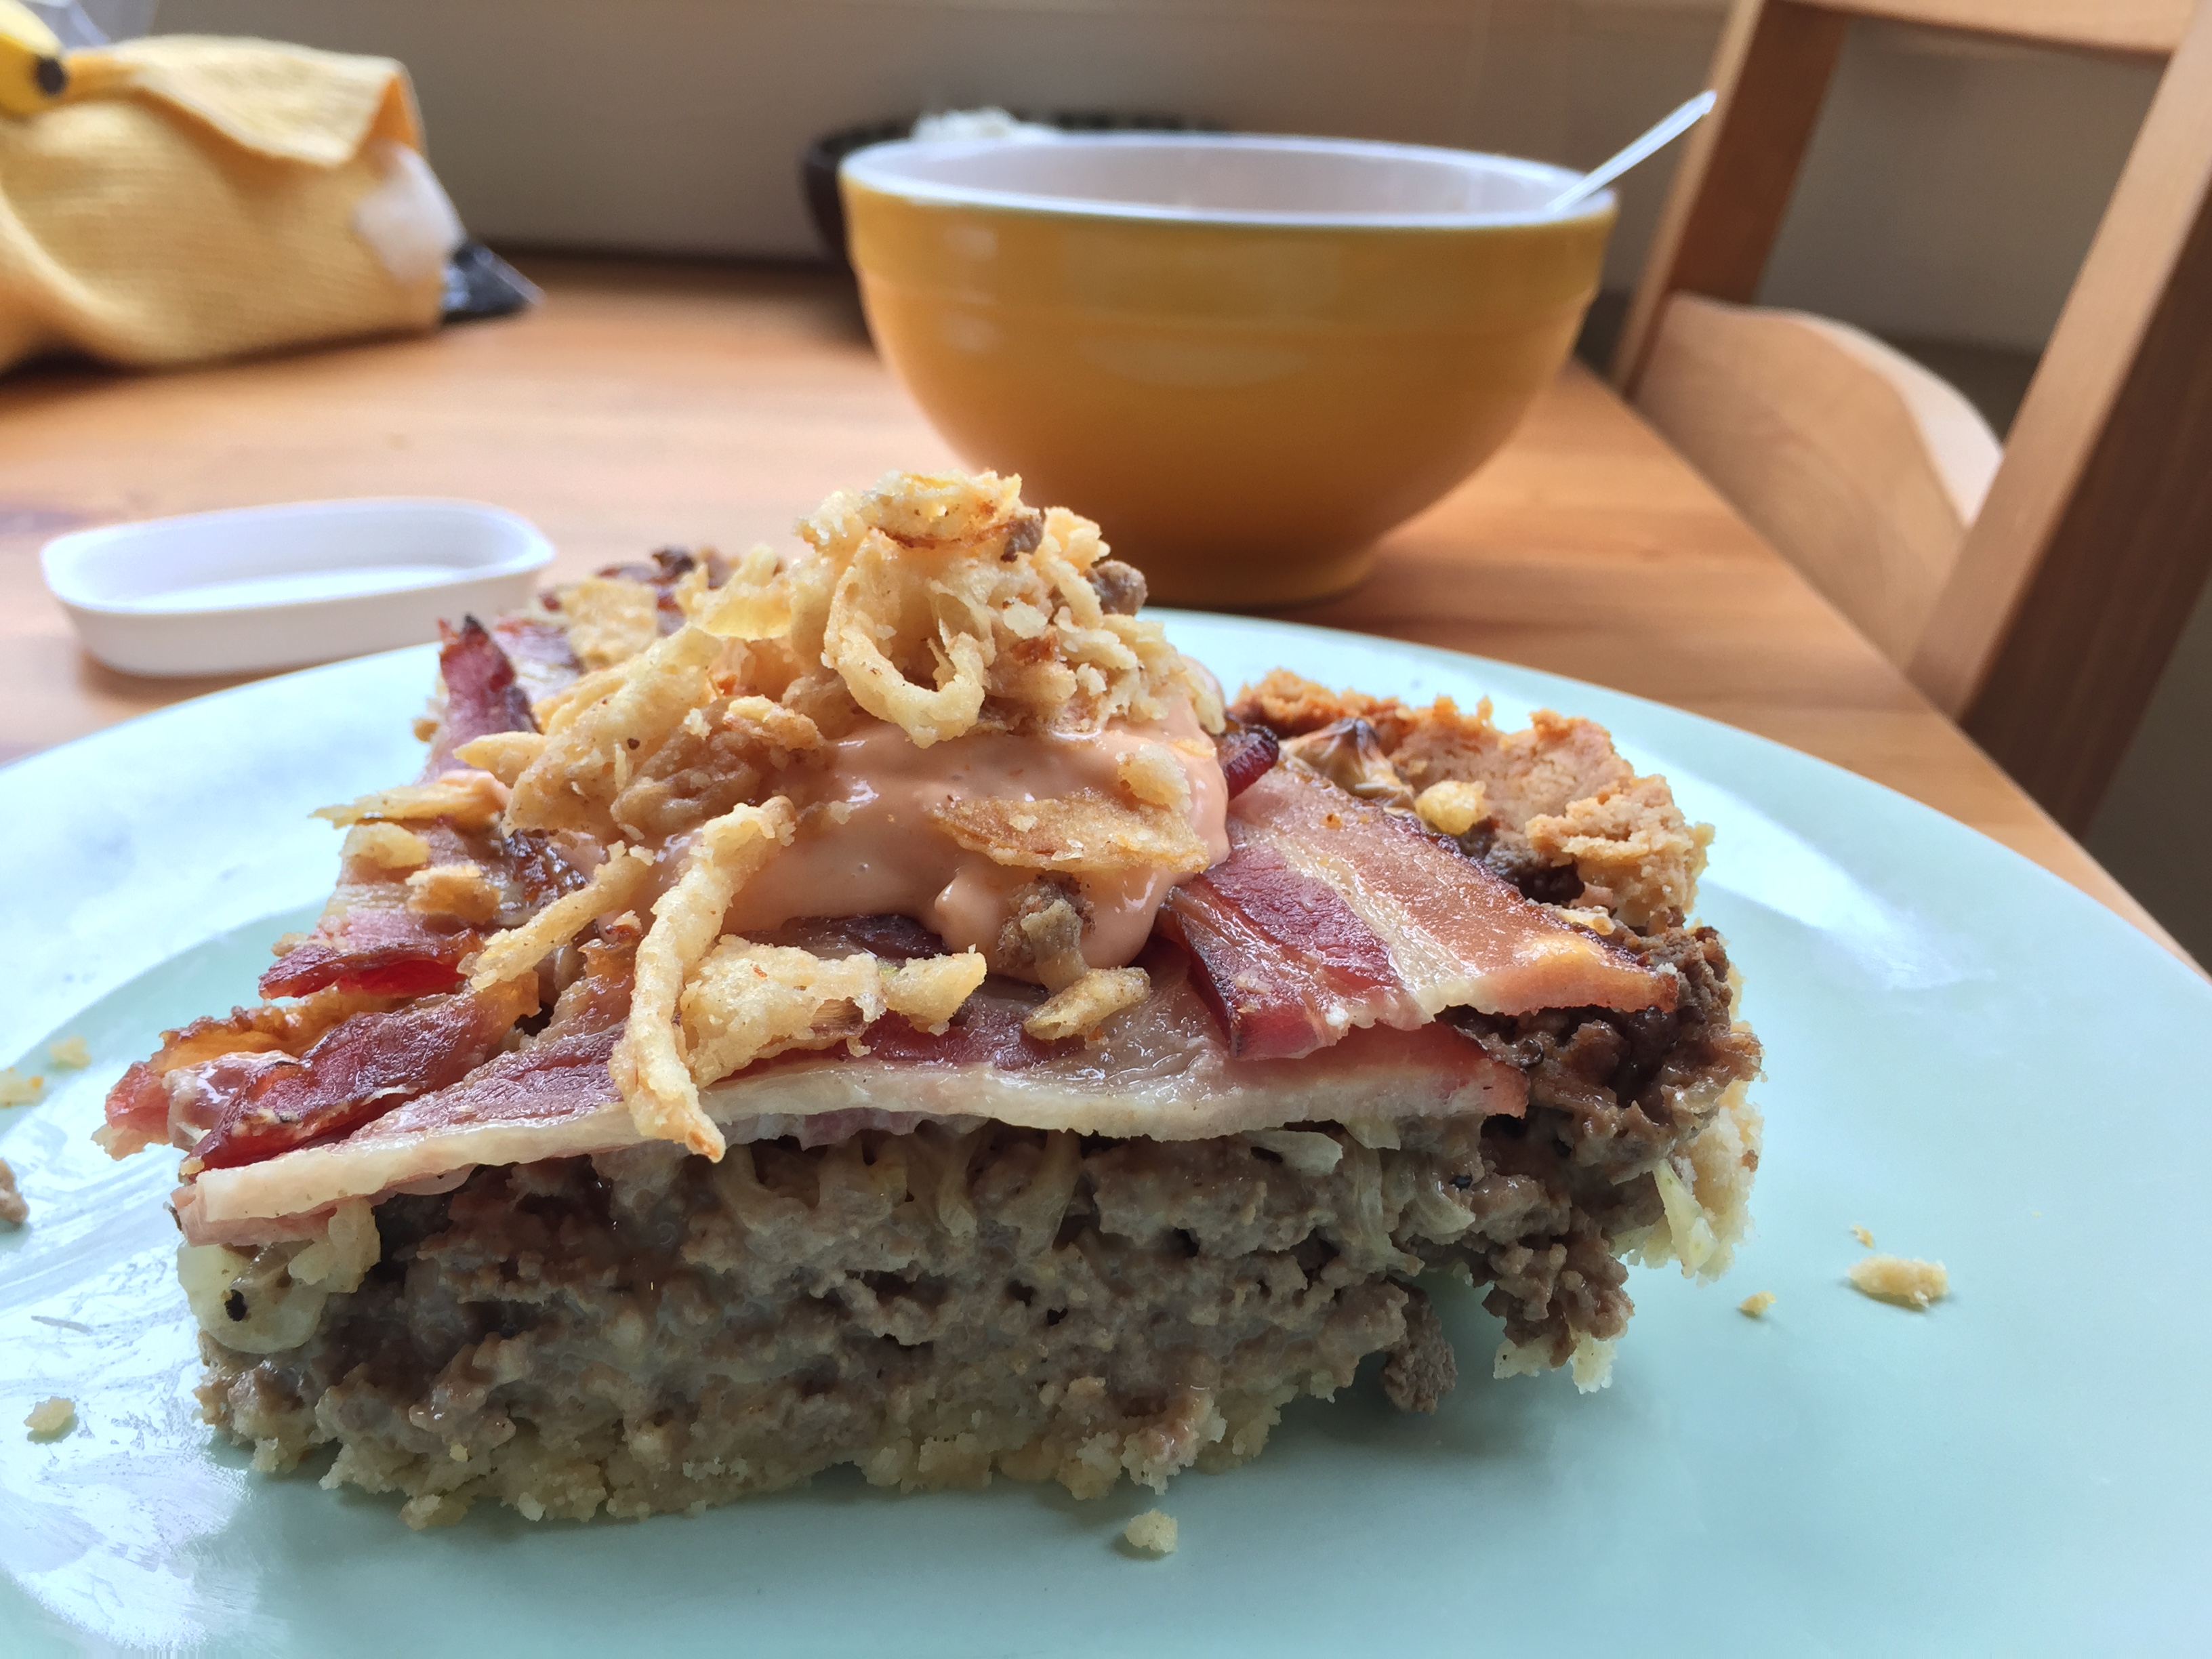
- 16 slices American cheese (YES, you need this)
Toppings:
- 3 tablespoons mayonnaise

- 1 tablespoon ketchup
- 2 teaspoons pickle relish
- 1 teaspoon dijon
- 1 teaspoon white vinegar
- French fried onions
Directions:
- Add flour and salt to the bowl of a food processor and pulse 3-4 times until combined. Add butter pieces and pulse 5-6 times until the consistency looks mealy. Then add the bacon fat and pulse another 3-4 times to combine. Remove the lid and spritz the ice water consistently over the top of the dough. Cover and pulse another 5 times. Check to see if the mixture holds together when squeezed. If not, add more water and pulse again.
- Pour pie crust dough into a large ziplock bag. Form a ball of the dough in the corner of the bag (note: this took a lot more arm work than what Alton’s video made it out to require). Flatten ball into a rounded disk and throw into the refrigerator for 30 minutes.
- Preheat oven to 425 degrees F and place pie pan in refrigerator. Place rounded disk on a large sheet of parchment paper dusted with flour. Dust the top side of the disk with flour and cover with an equal sized sheet of parchment paper (note: Alton calls for rolling the pie dough in the zip lock back but I found that this method worked a lot better).
- Roll the dough out until it reaches about 11-12 inches. Do you own a rolling pin? I didn’t think so. Neither do I. Guess what works just as well as a rolling pin? A wine bottle!!! I suggest a good cab or zin as their shapes are most even and similar to a rolling pin.
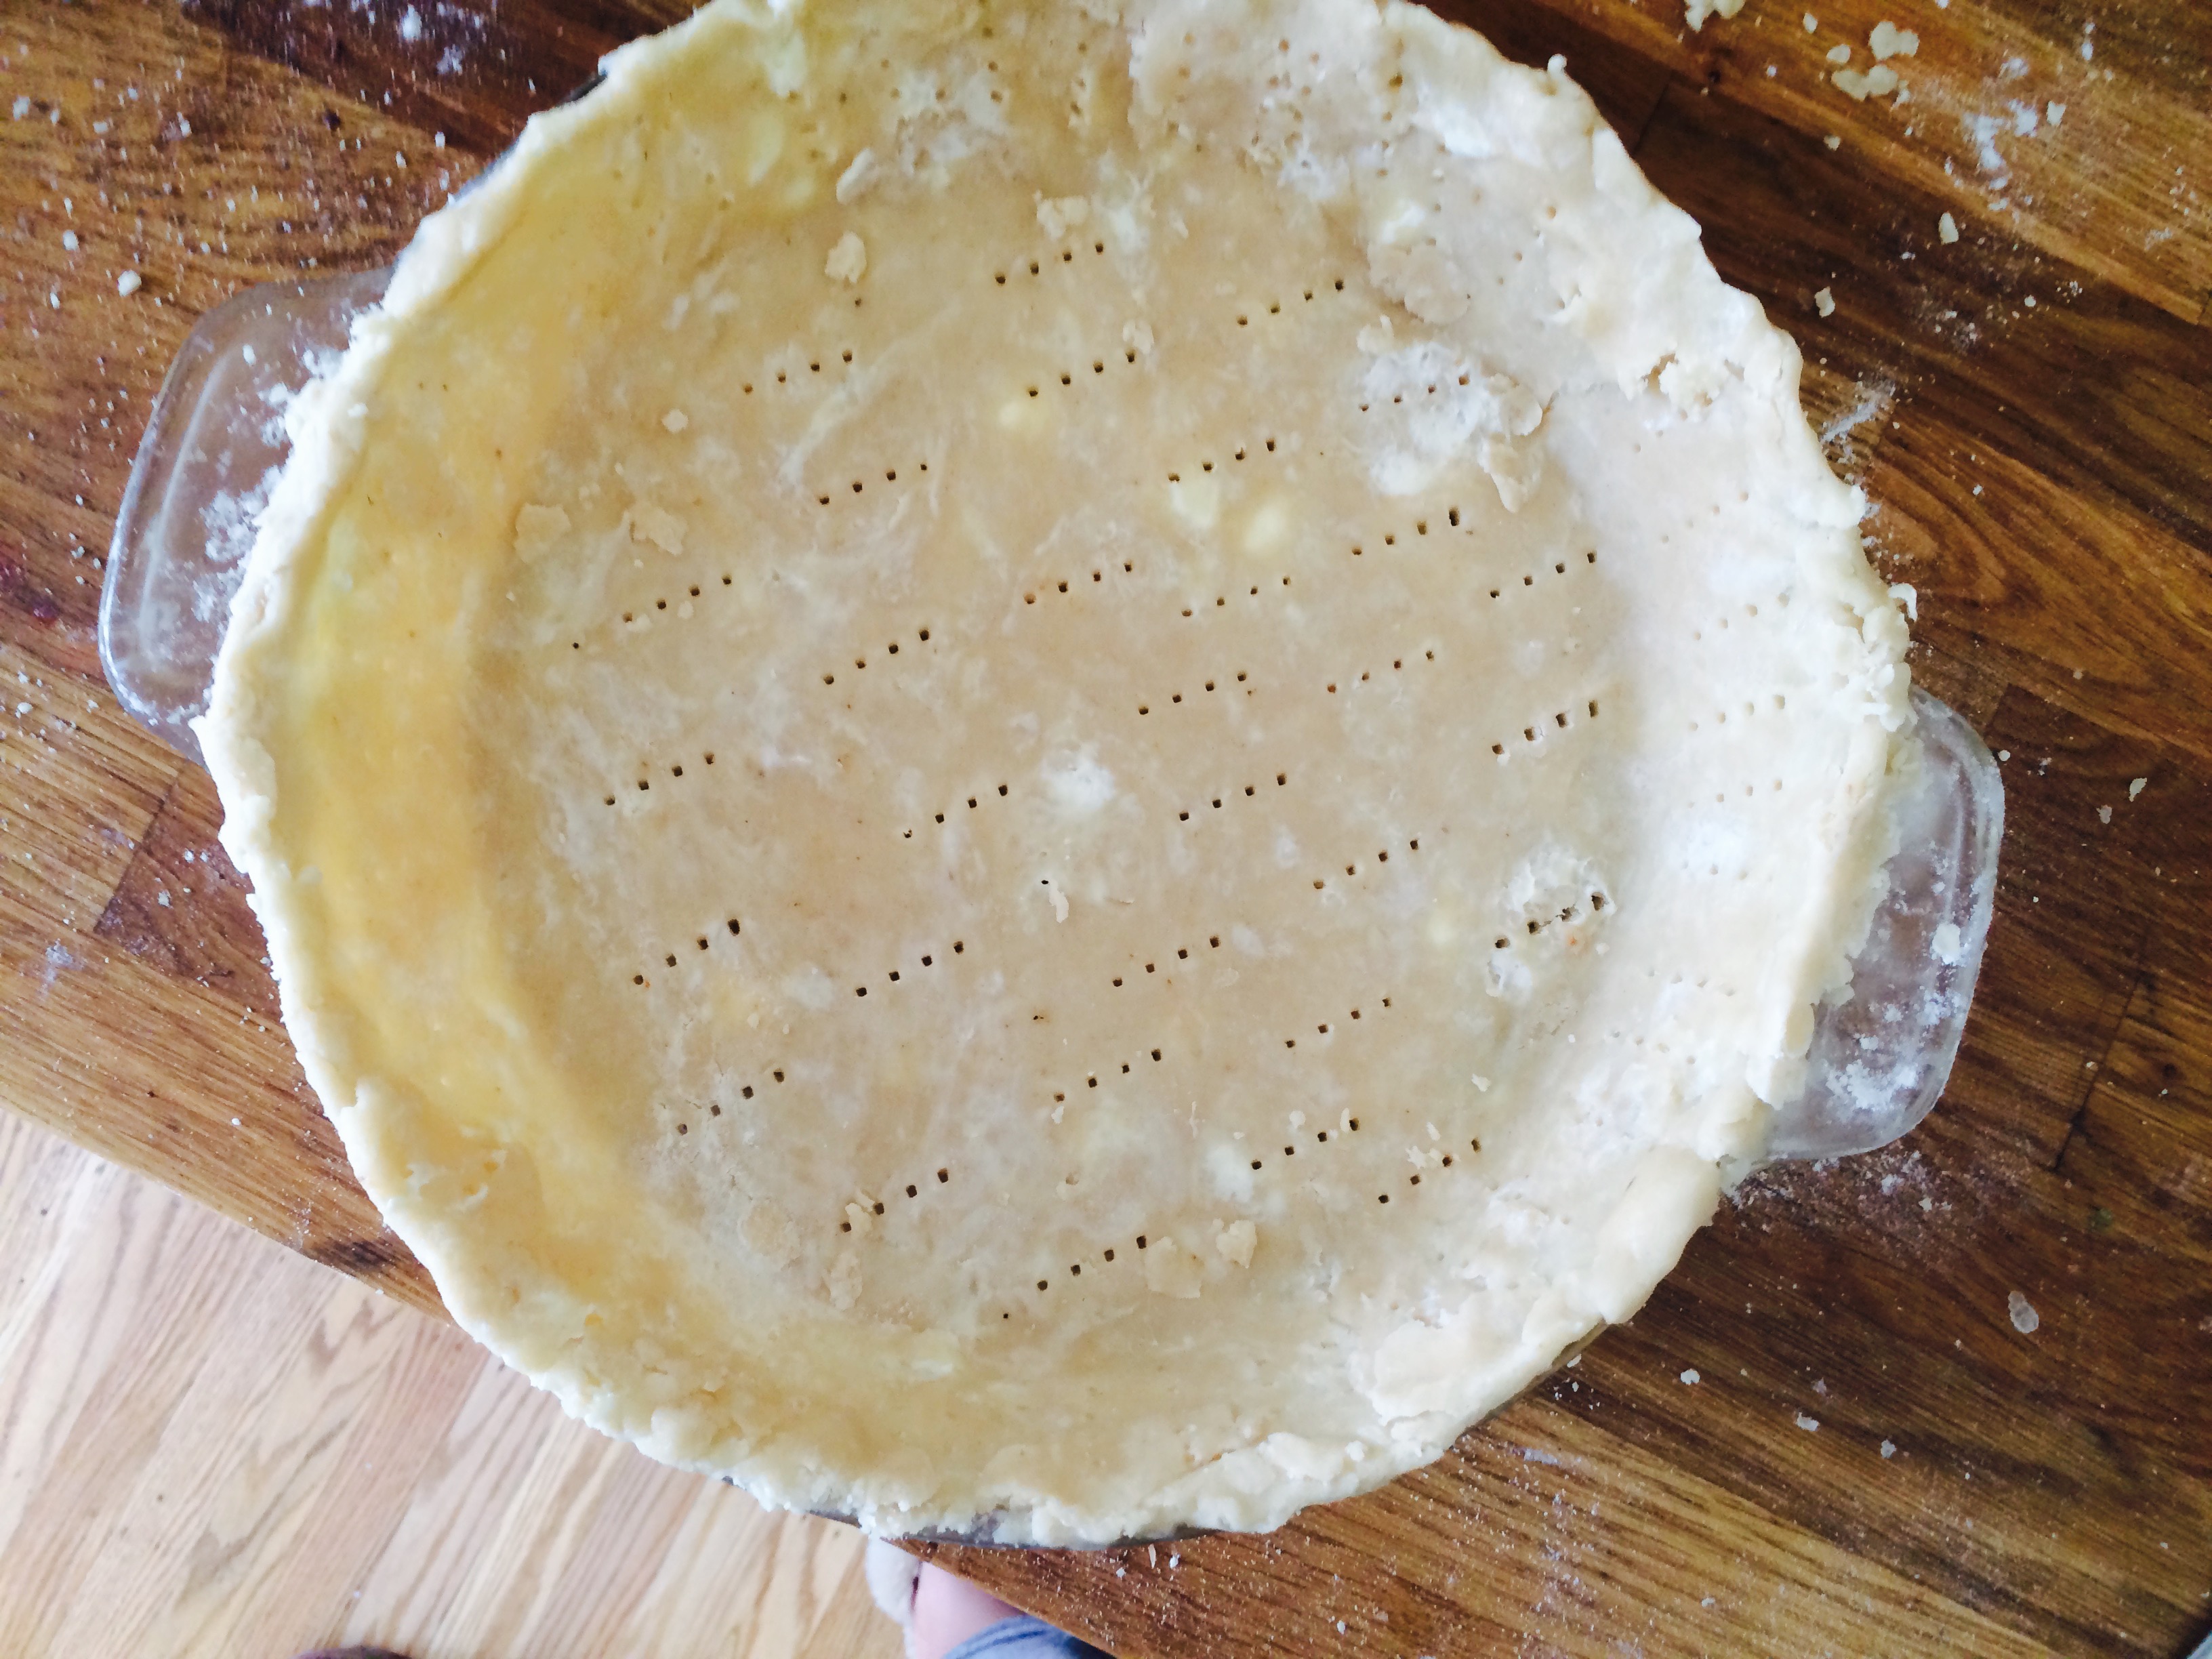
- Carefully remove the top layer of parchment paper and drape the dough over the pie pan. Press the dough gently into the pan and remove the second layer of parchment paper (reserve it for baking). Fill in the gaps – use whatever excess dough you can find from the edges to fill in any problematic areas. Remember, this is all going to be covered in deliciousness in a second so no need for this to look James Beard worthy. Just make sure there are no huge holes.

- Using a fork poke holes in the pie crust then place into the fridge to cool for 20 minutes.
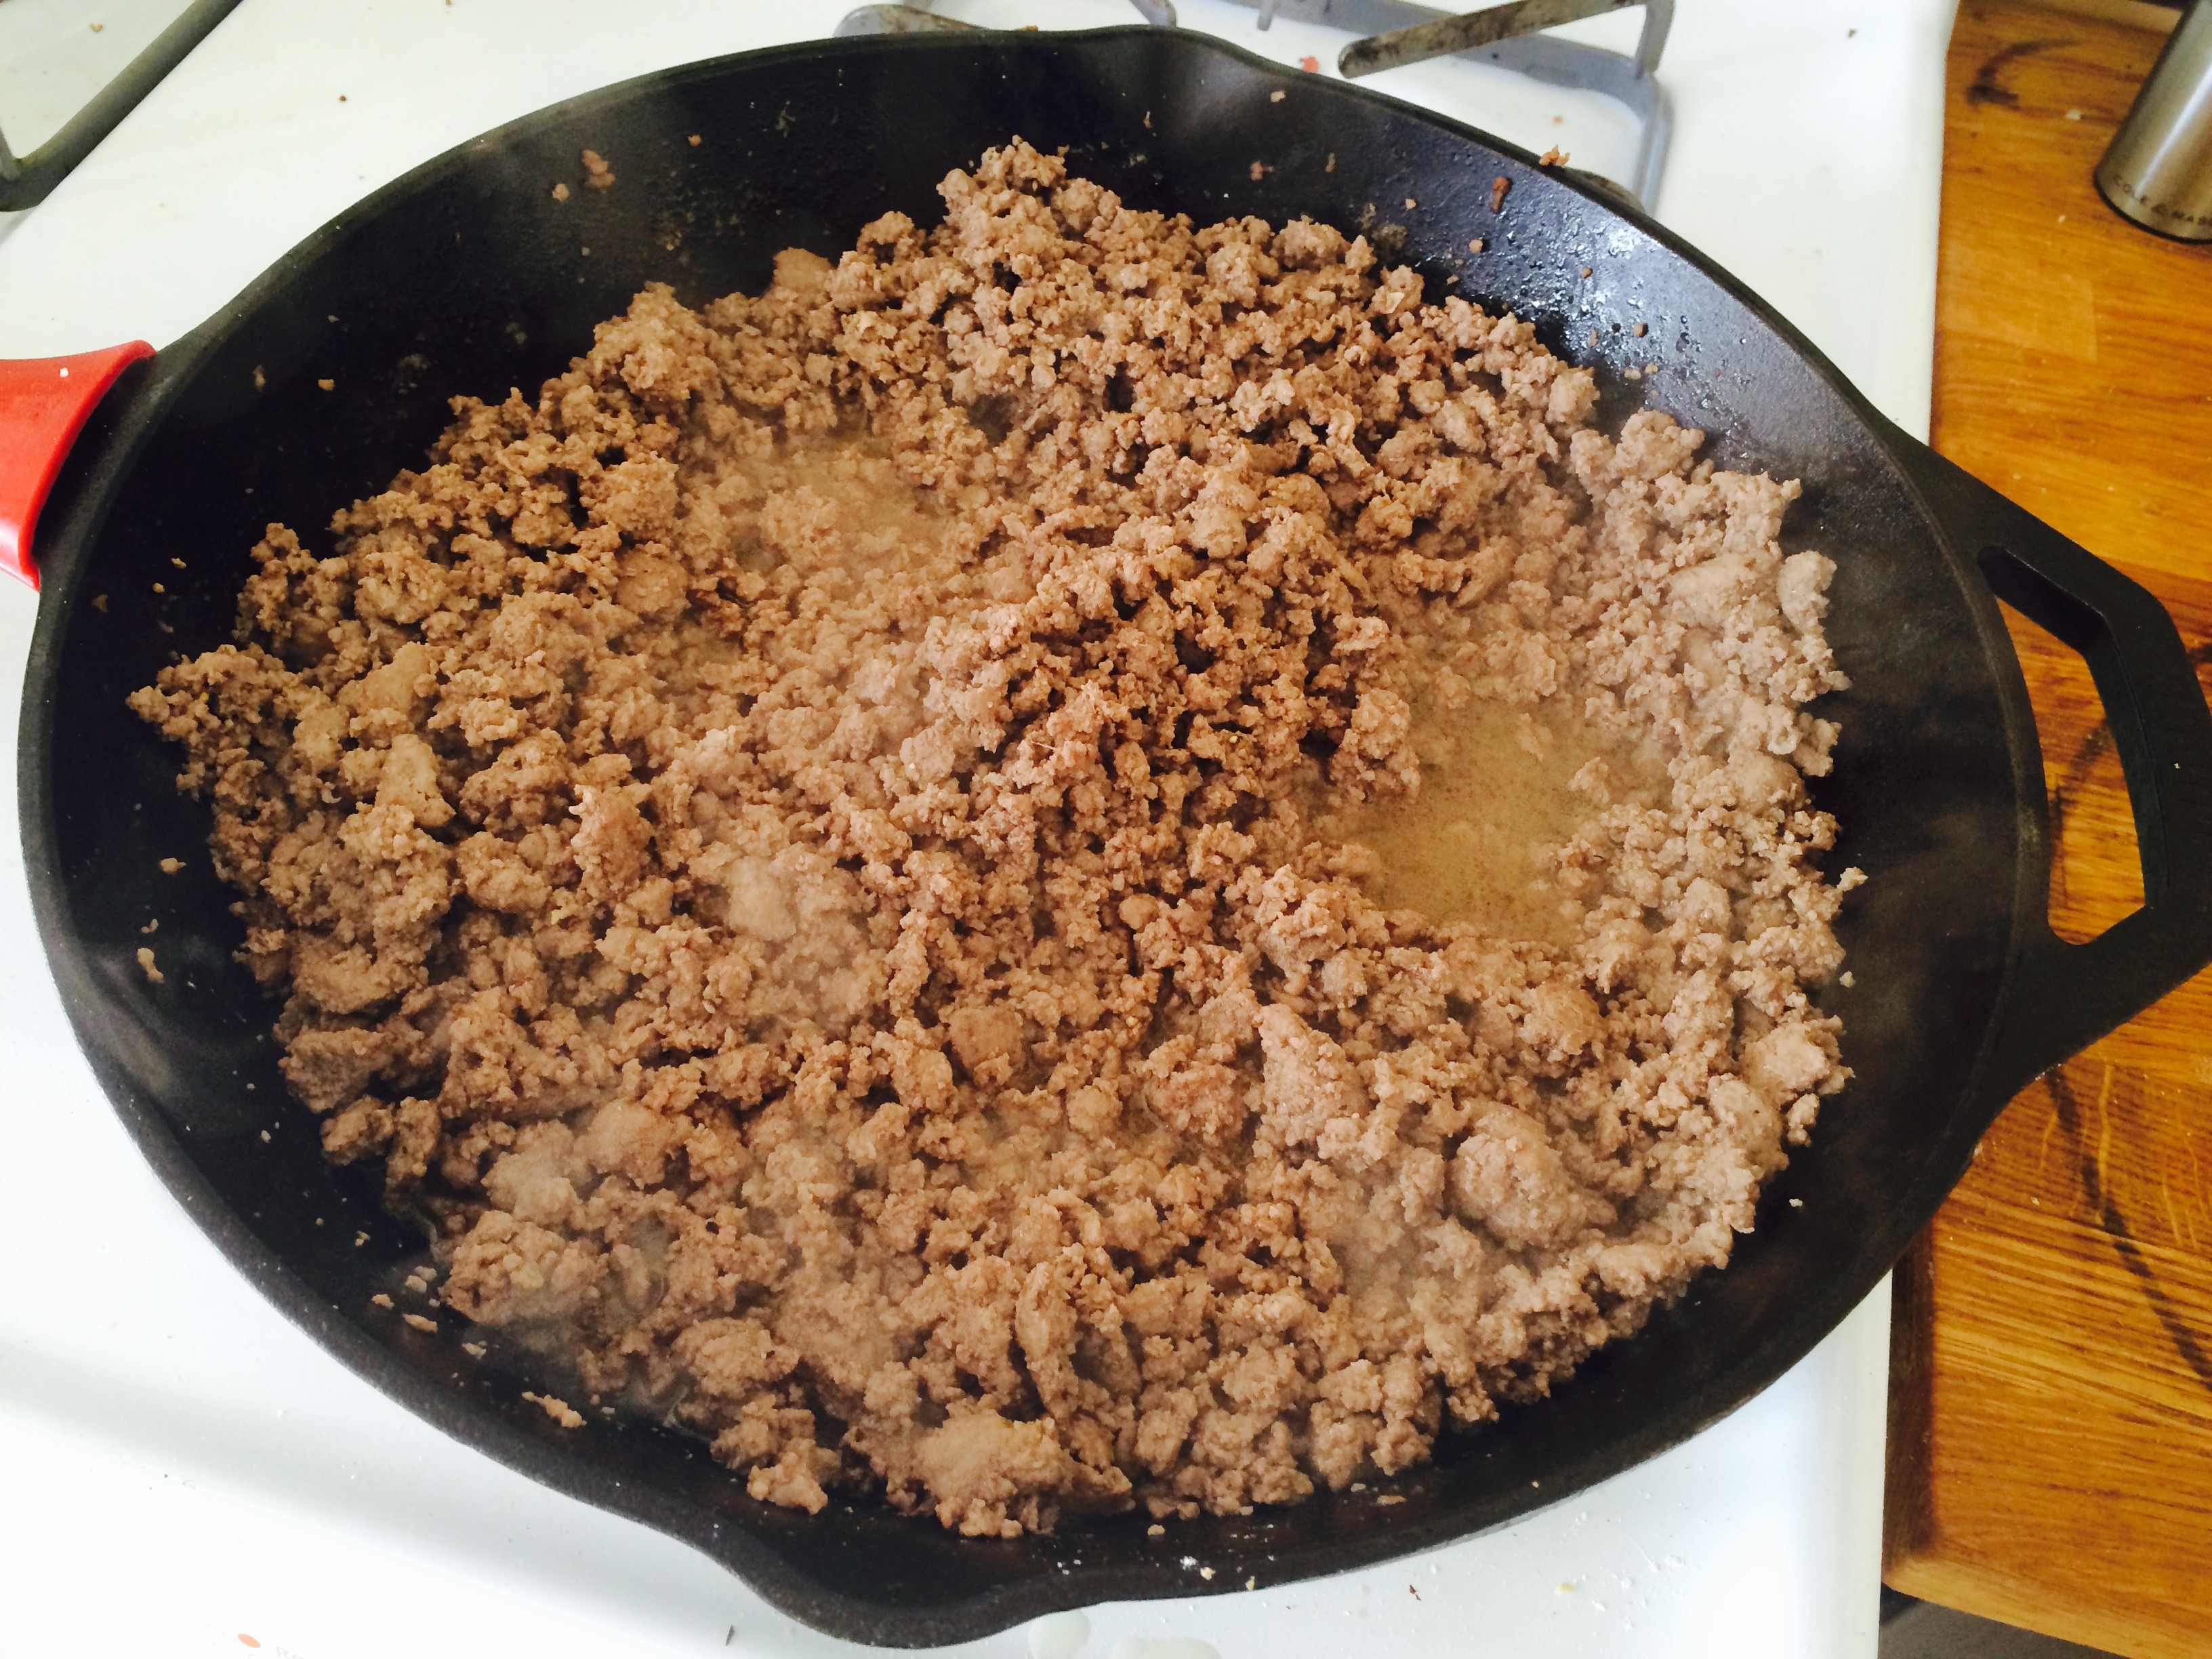
- While the dough is cooling let’s get started on the filling. Heat a couple tablespoons of olive oil in a heavy duty pan over medium-high heat. When oil is hot add the ground beef and brown, breaking up with a wooden spoon. When the meat is almost cooked through season quite liberally with salt, freshly ground pepper, and cumin. Cook for another minute then drain fat from pan and reserve meat for later.
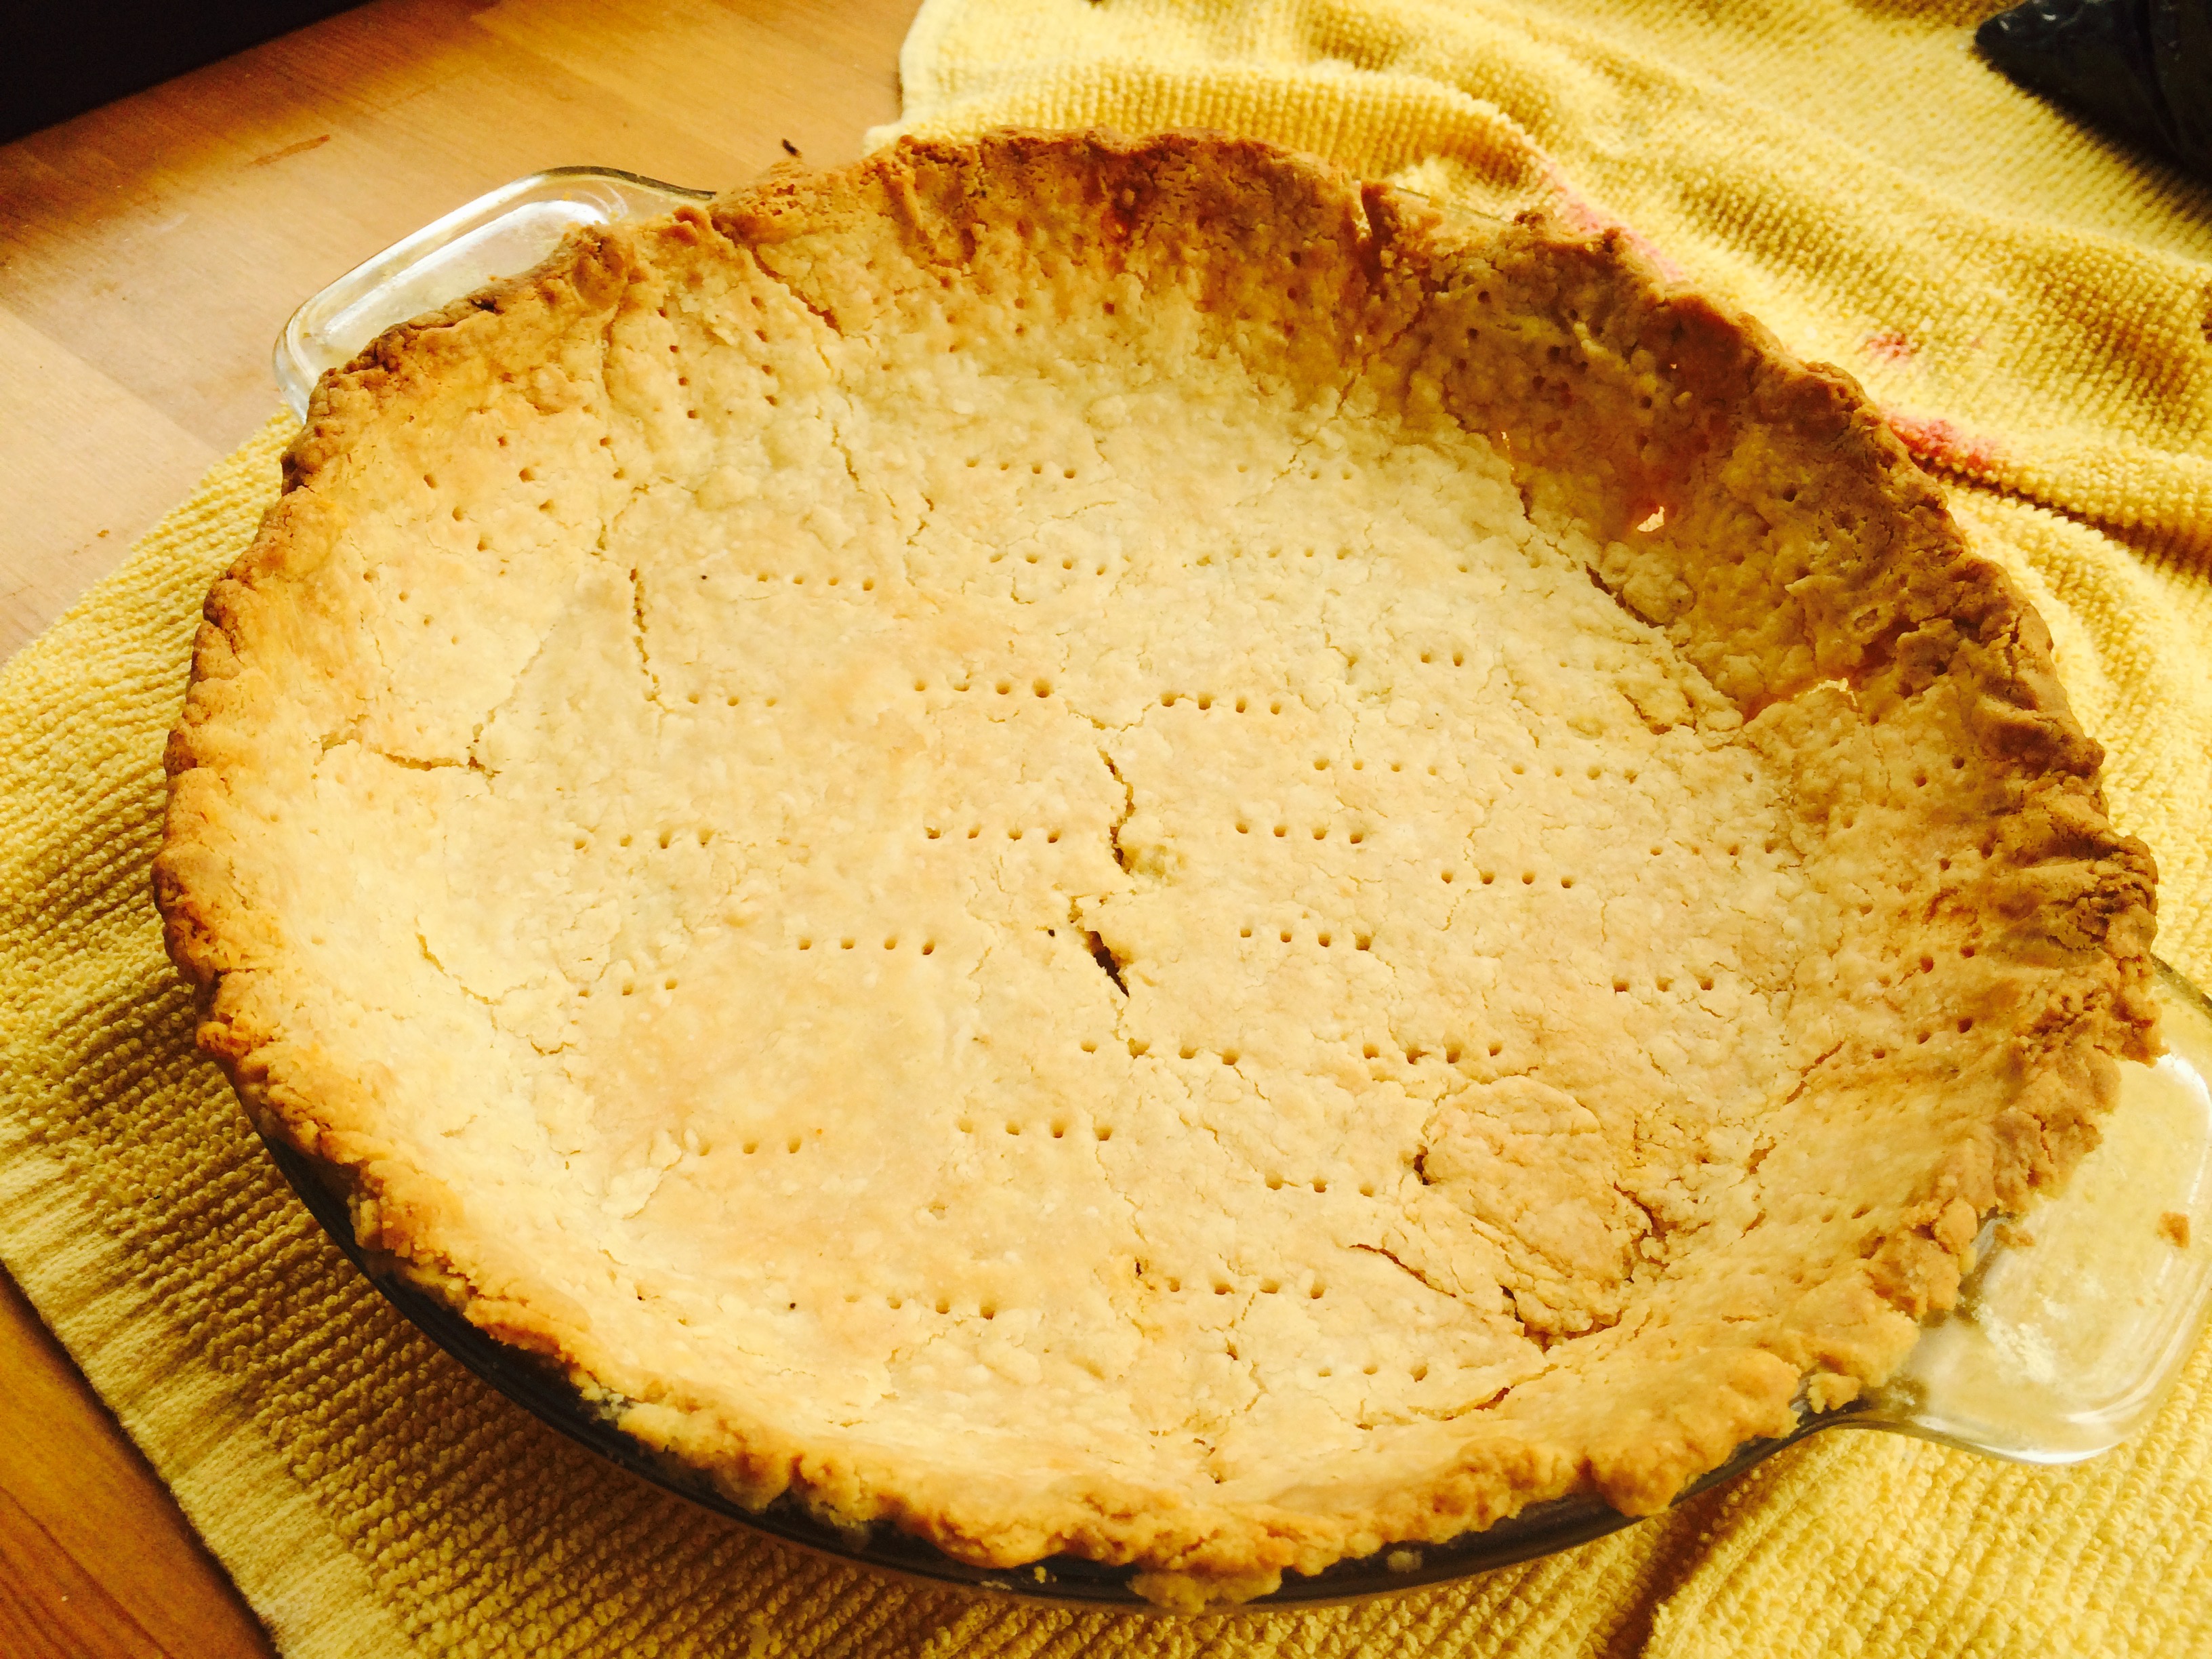
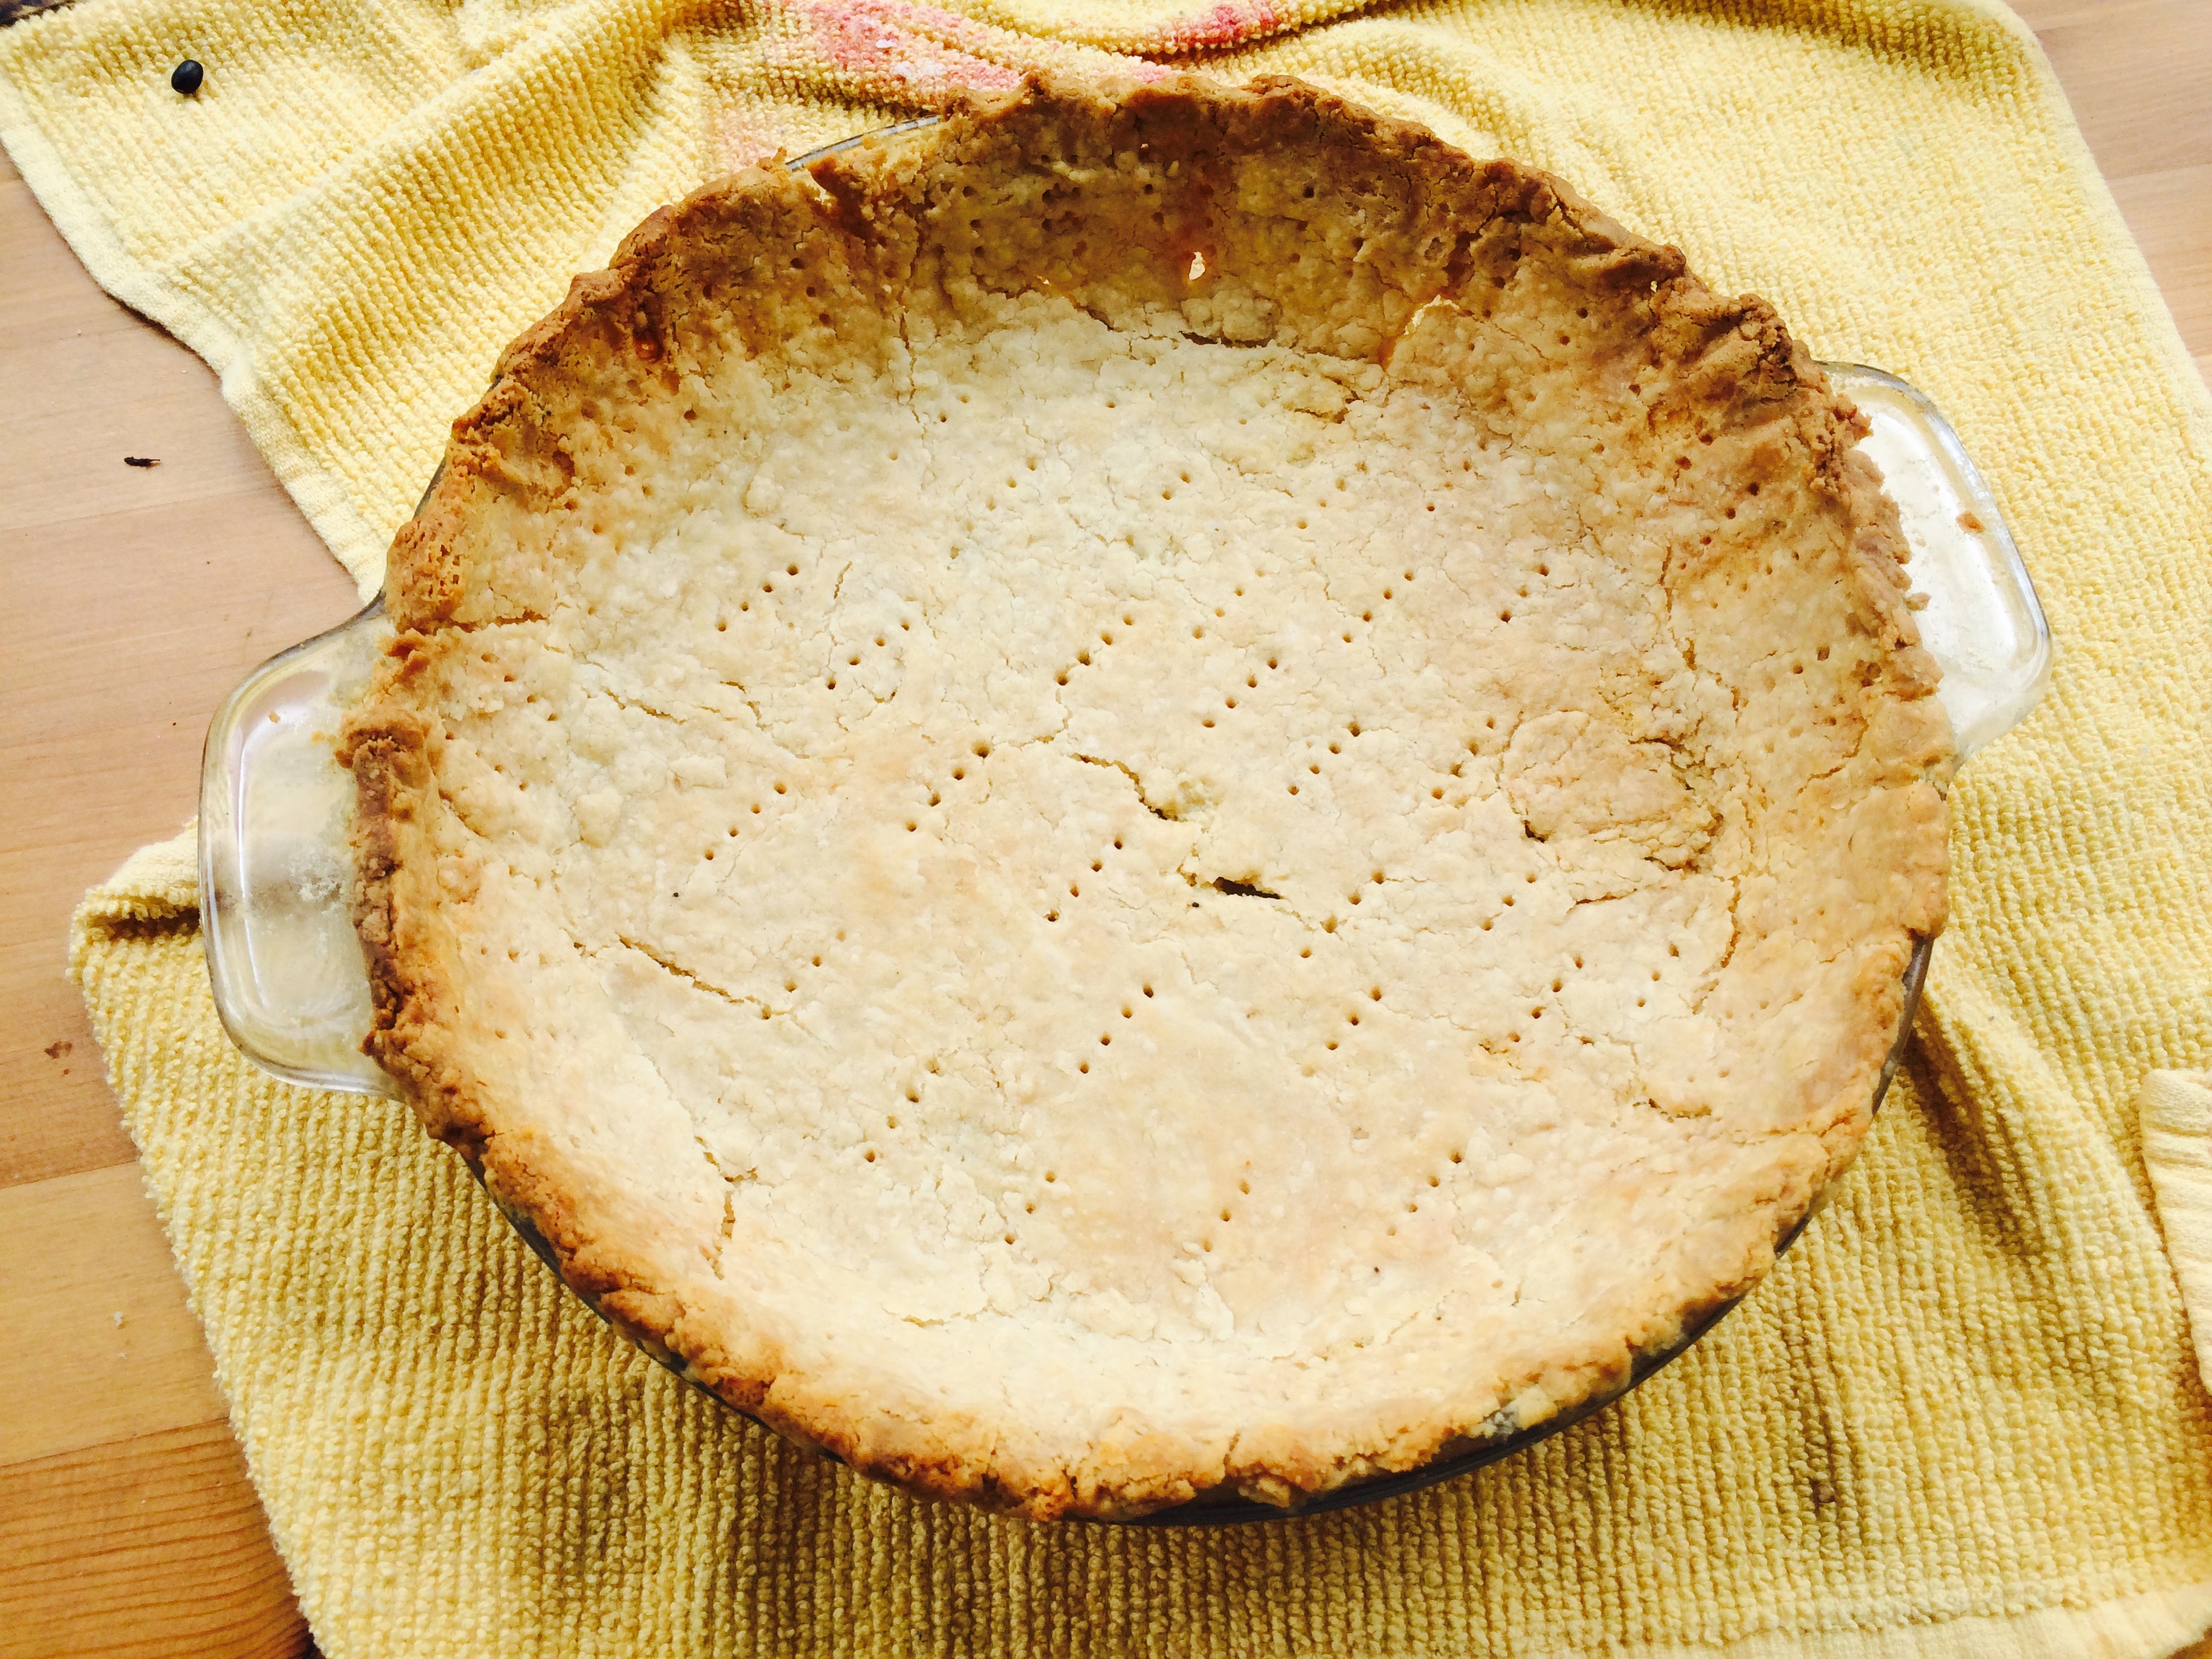
- Remove pie crust from fridge and cover with reserved piece of parchment. Place dried beans on top, making sure that the weights hold down the entire bottom portion of the crust. Place in oven for 10 minutes then remove parchment paper and beans and cook an additional 10-15
 minutes until golden brown. Let cool on a wire rack.
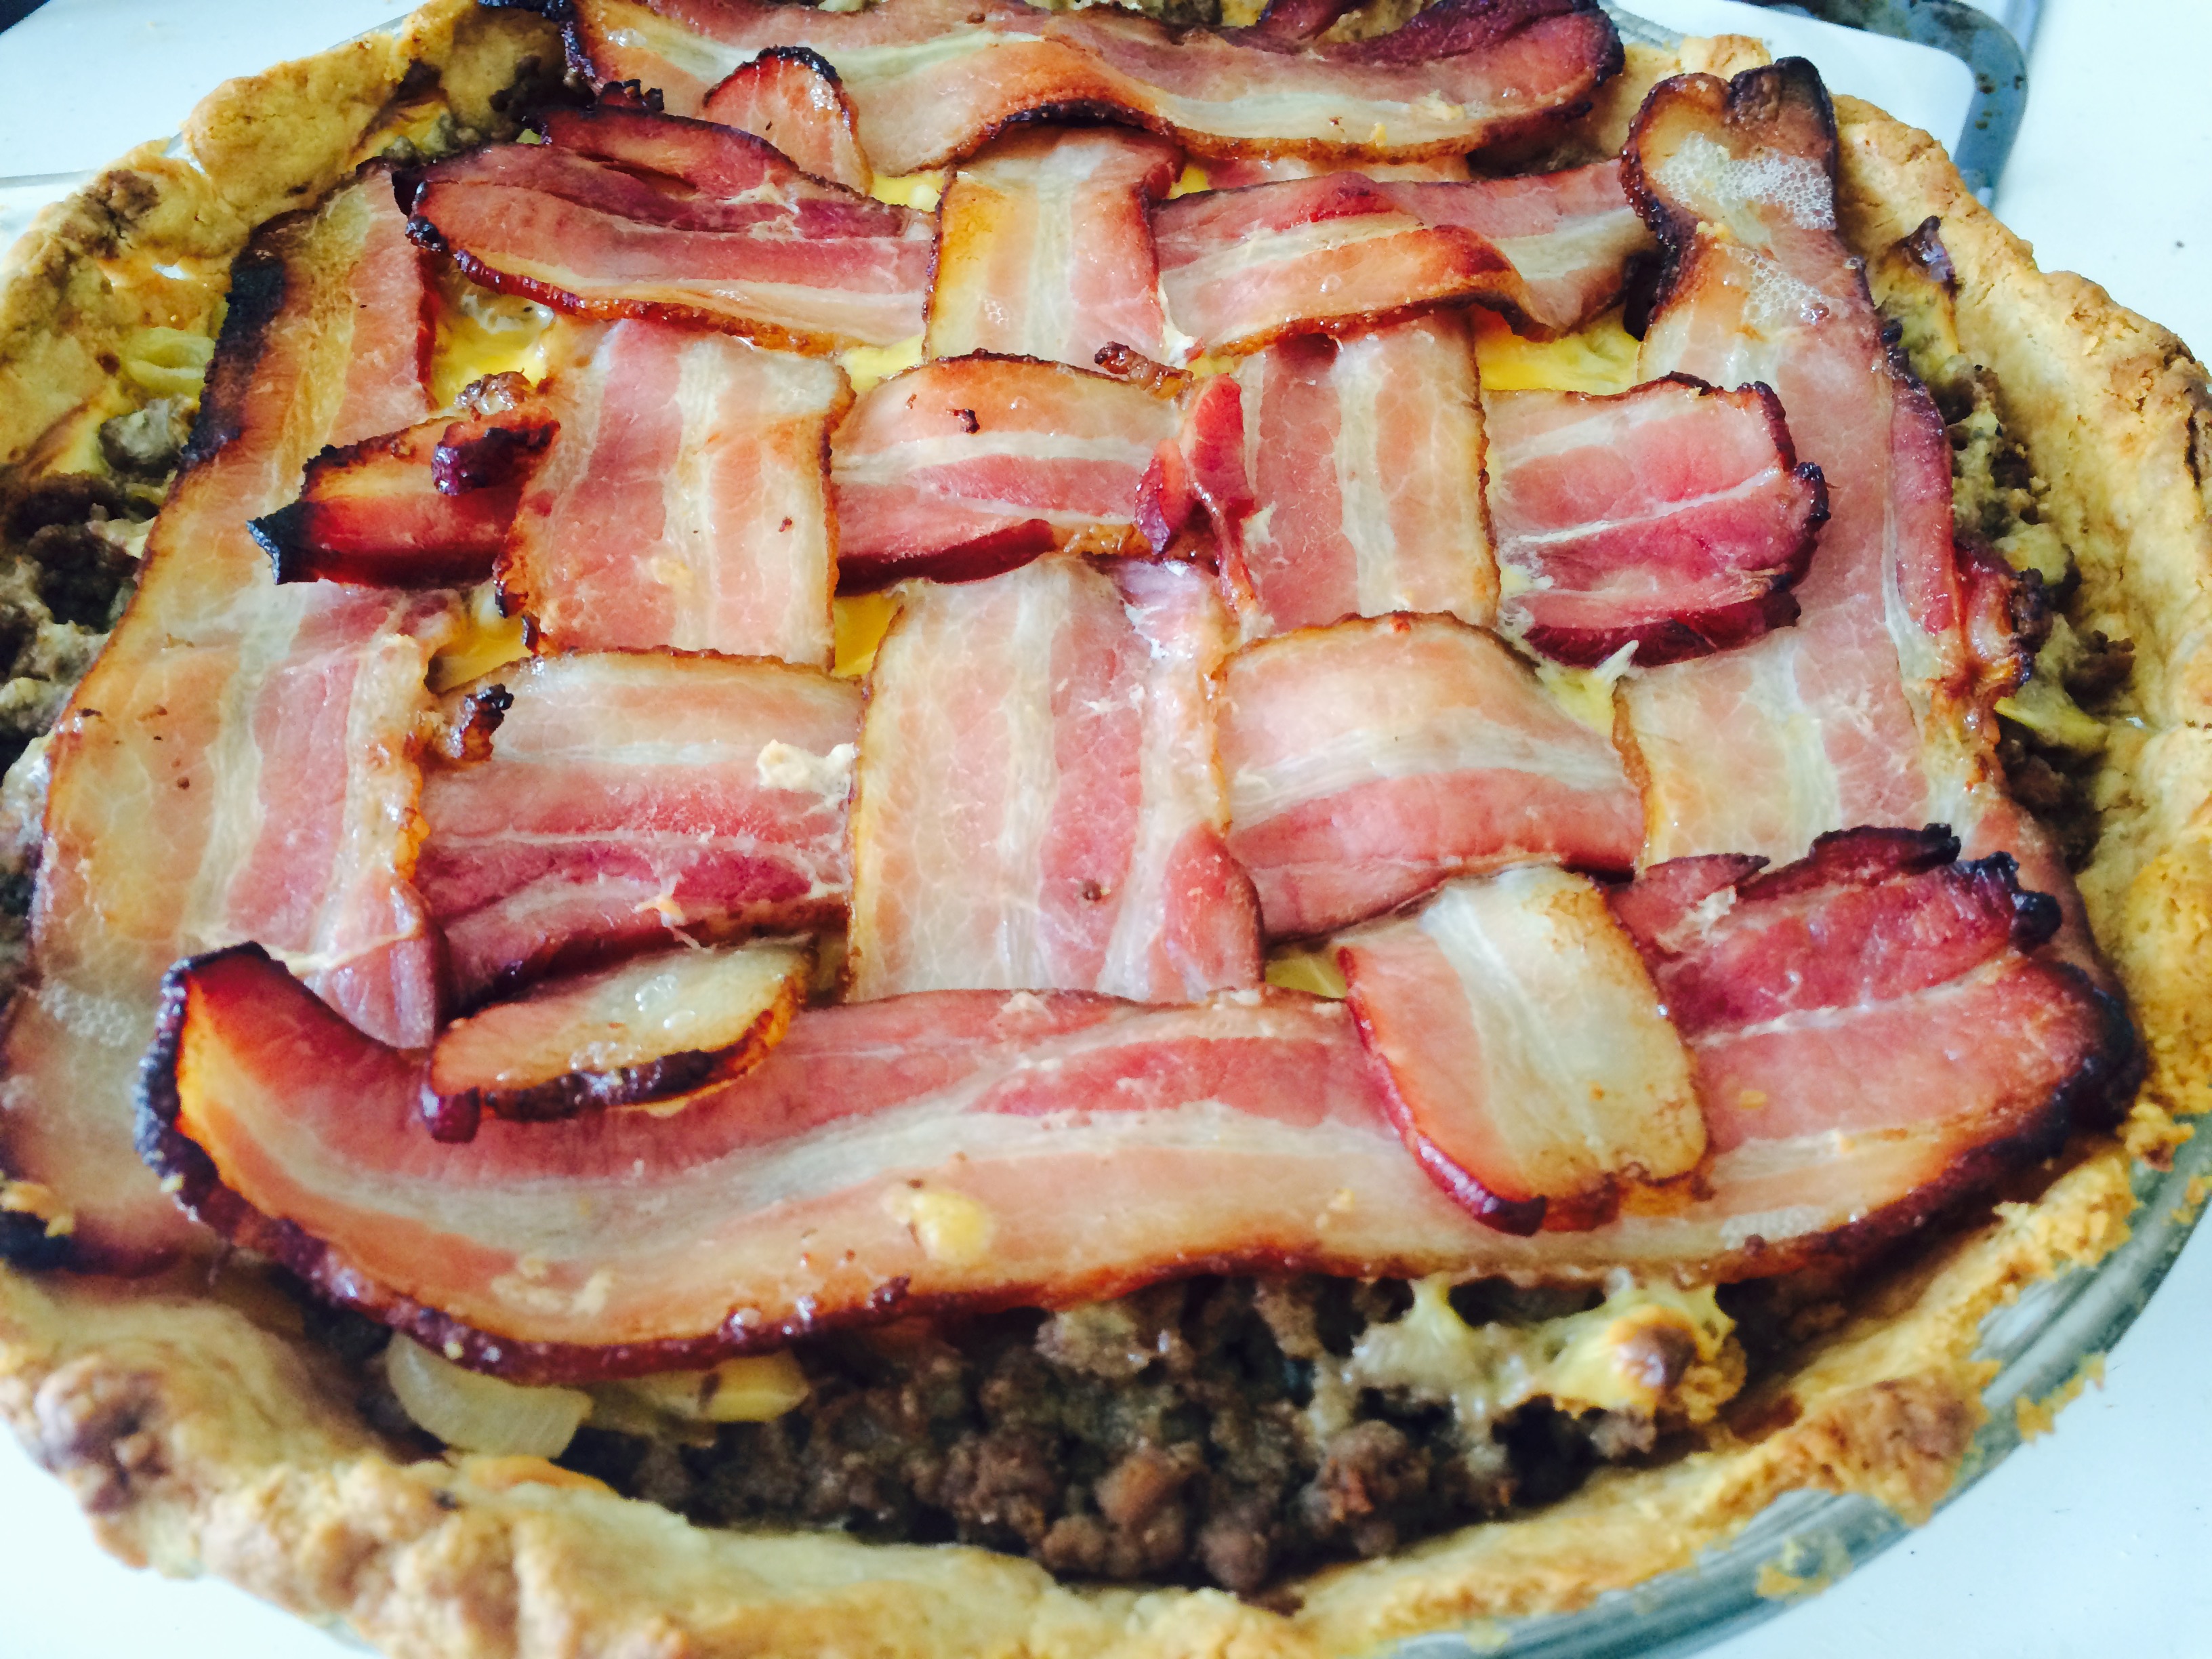
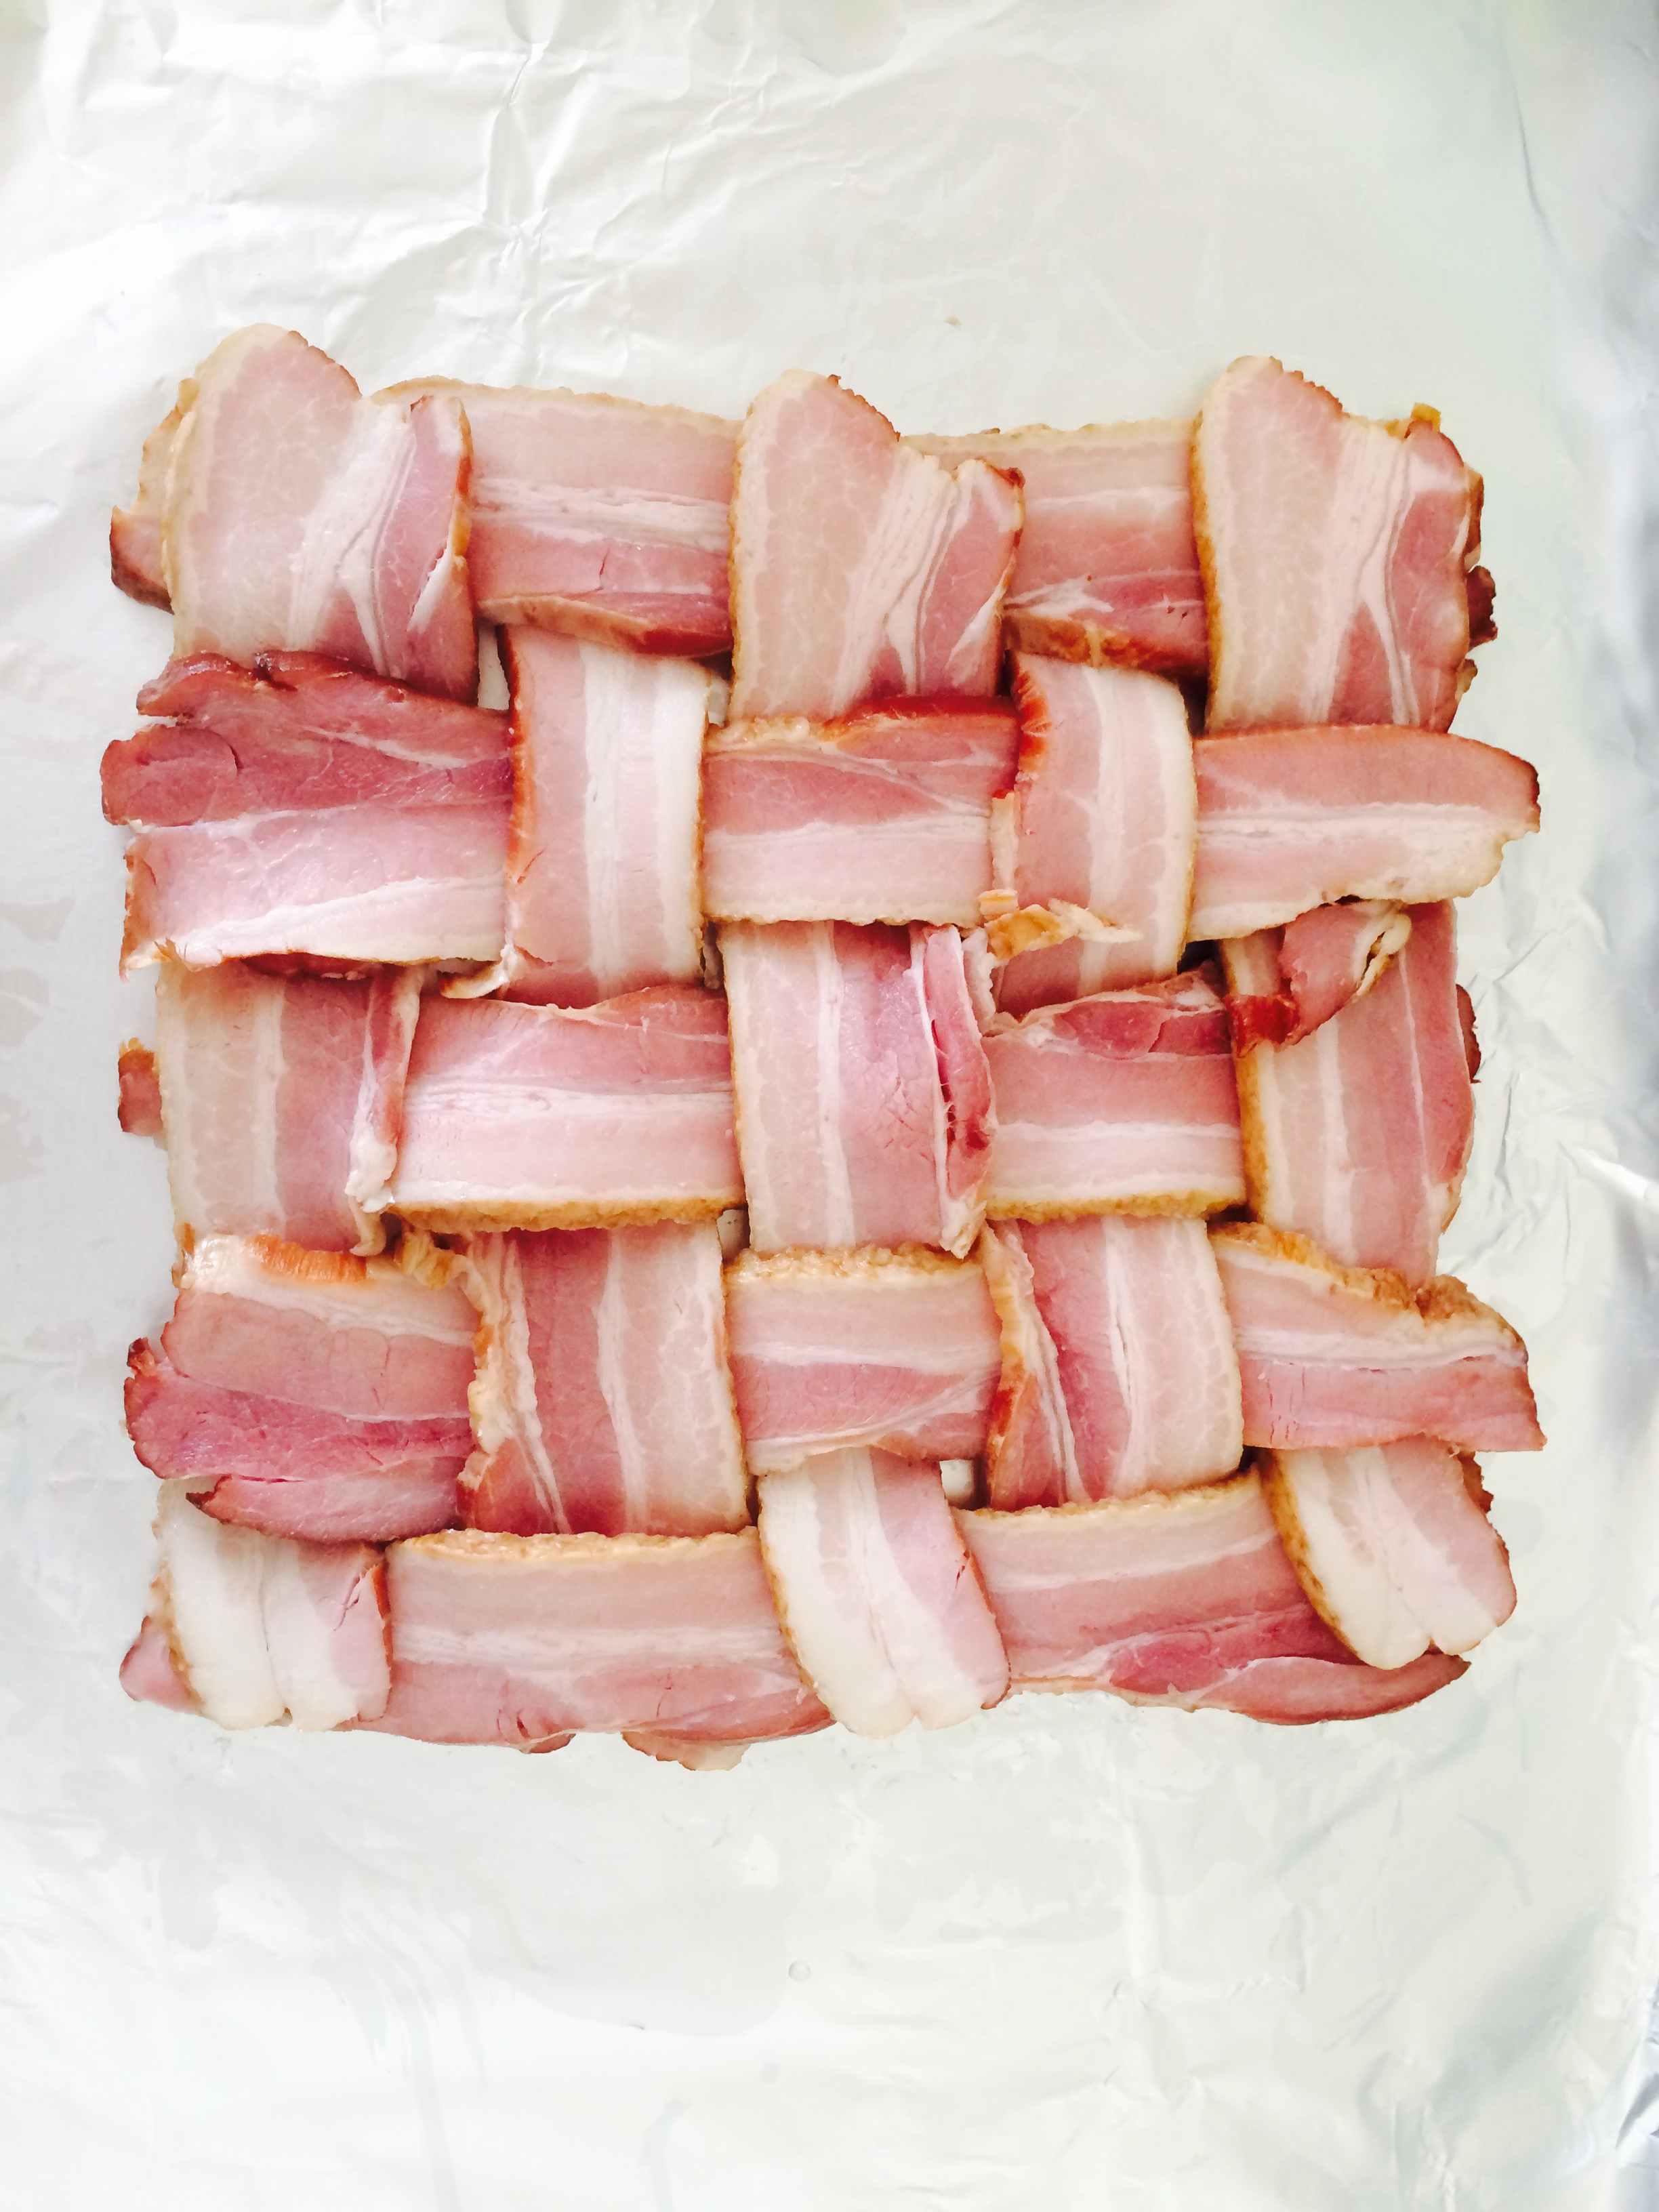
 - While crust is cooking let’s start working on the bacon lattice topping. Line a baking sheet with foil or use a wire rack. Place five slices of bacon next to each other vertically. Lift the second and third pieces up partially and place one slice of bacon horizontally down. Repeat with remaining four slices switching up which slices are on top/bottom. Once the lattice square is set, place in the oven and cook for 10 minutes until bacon is starting to brown but is not yet crispy. Let cool.
- Meanwhile, heat another tablespoon olive oil in the same pan you browned the beef in. Add the sliced onion and saute until they start to brown and become very fragrant (~10 minutes). Season liberally with salt and pepper then remove to a bowl for later.
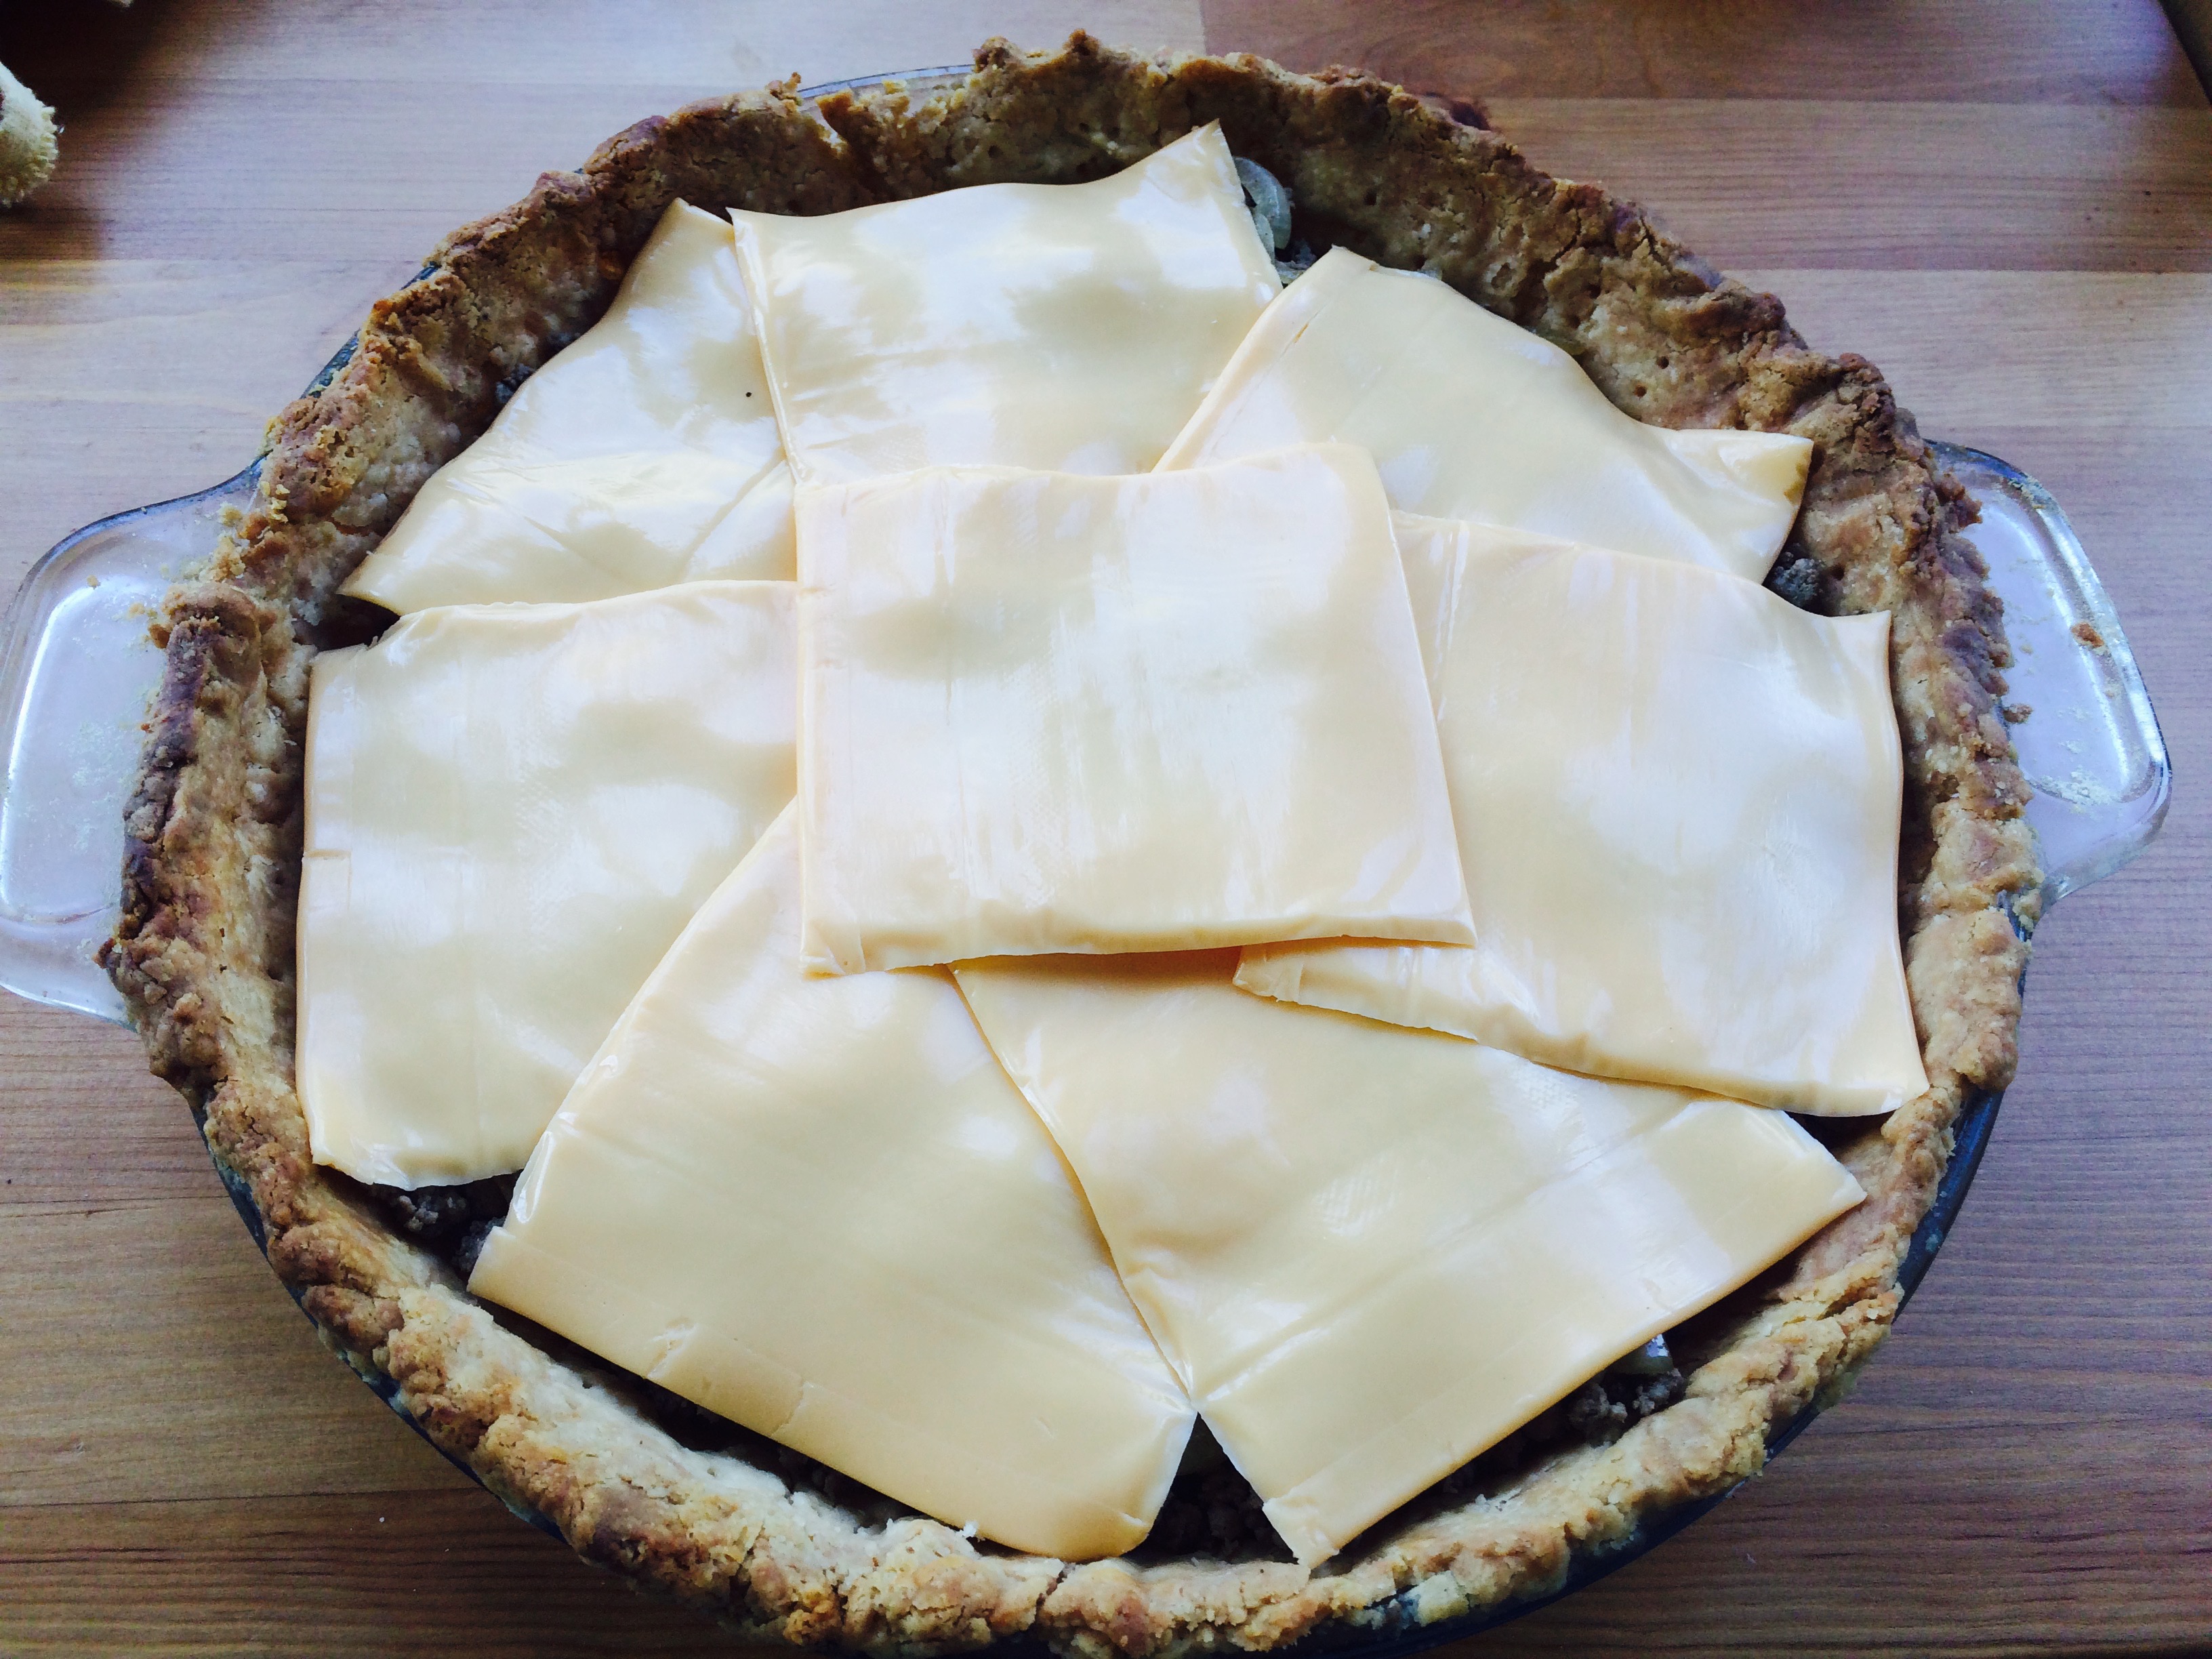
- Let’s assemble the pie (keep the oven on)! Once all the parts have cooled you can start assembling the pie. Place ground beef on the bottom of the pie crust, gently pushing down as much as possible (without breaking the crust). Top with the onion slices. Cover beef and onions with the 16 slices of cheese (this may seem like a lot but during the baking the cheese will melt into the beef creating a sort of creamy binder). Finally, top with the bacon lattice (hint: flip the lattice from how it was positioned on the baking sheet to make sure it gets even baking on all sides).


- Place assembled pie back in the oven for an additional 20 minutes or until the bacon is nice and crispy. While pie is cooking put together the sauce (ala In N Out)! Combine the mayonnaise through vinegar in a bowl, stirring to combine, Set aside for later.
- Once the pie is done remove from oven and let cool on a rack for 10-15 minutes. Cut into serving slices and dollop with the sauce and french friend onions. Can also be served room temperature.