Italian Sausage & Mushroom Sauce

This was my mom’s go-to pasta sauce growing up and one that I started tinkering with when I was in college. It’s incredibly easy to whip up and follows my freezer food philosophy. I always like to keep some on hand frozen in single servings for those late nights when I need something hearty to soak up the booze or for when I need a quick meal. This has probably 1/100th of the amount of sodium you would get in a processed frozen meal and it’s way tastier. I have always made this sauce by memory and never bothered to pay attention to the amount of each ingredient I was using but here is my attempt at breaking it down.

Here’s what you need:

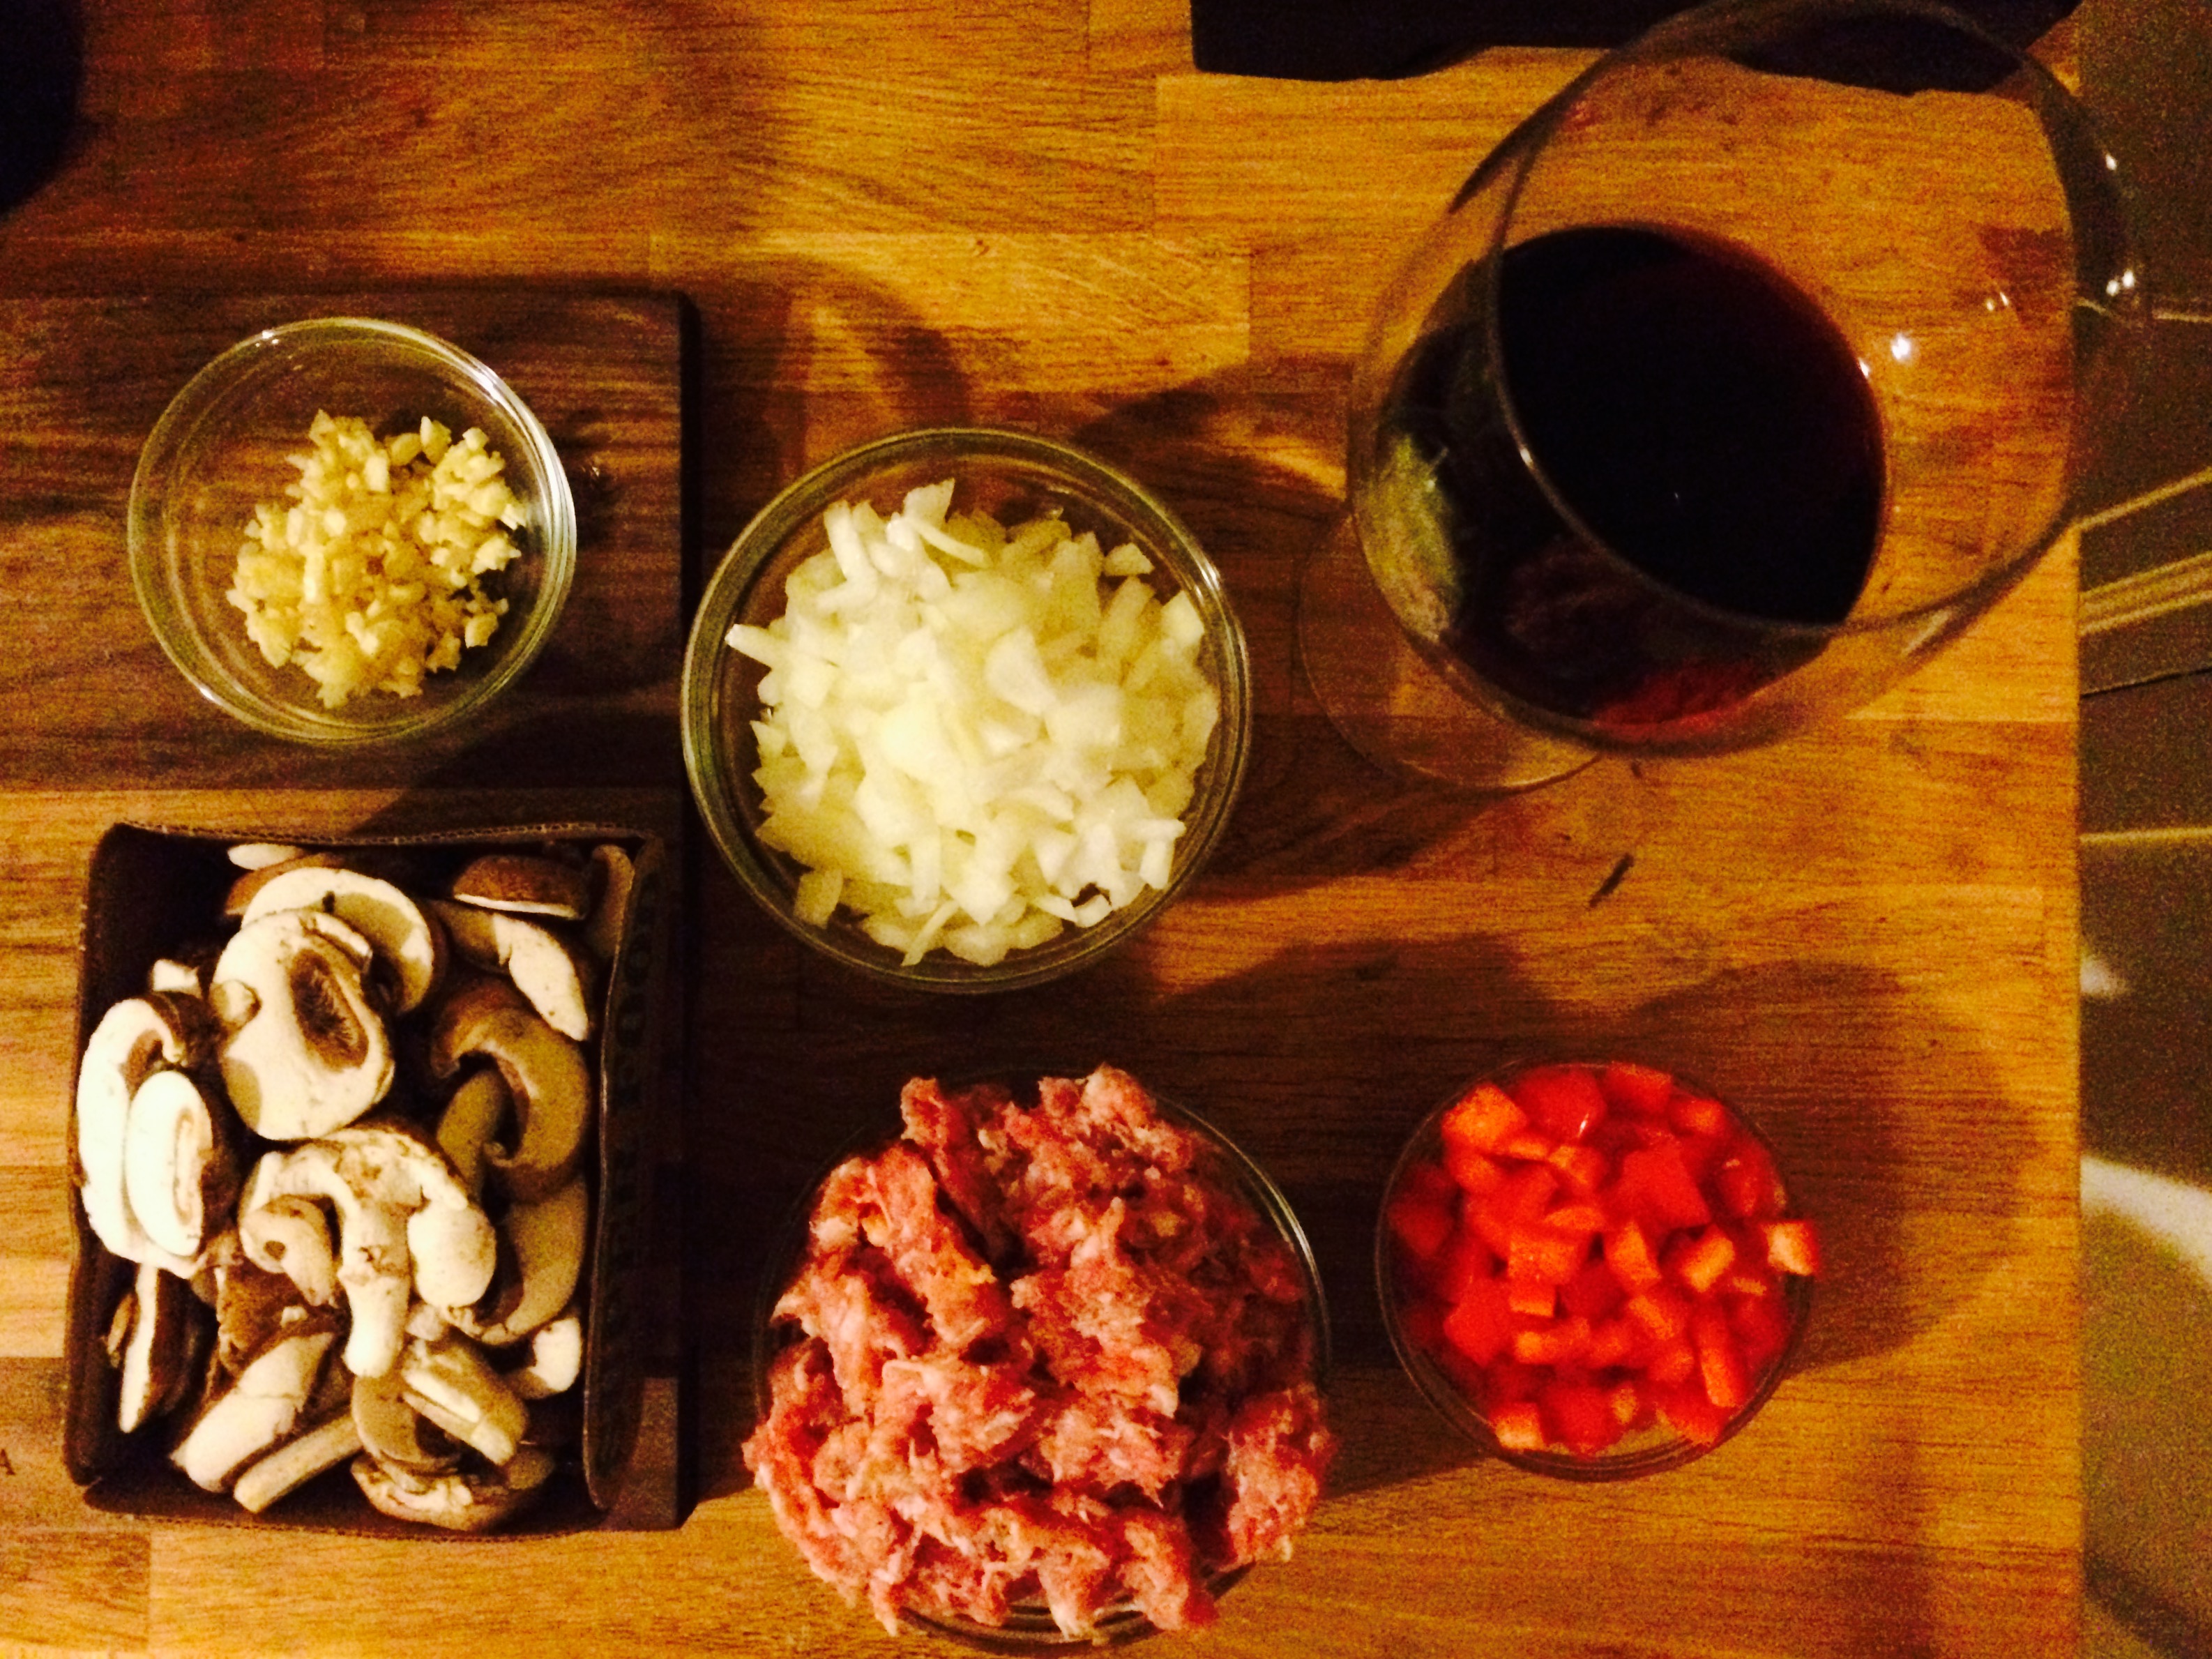
  • 1 small yellow onion (or half of a large one), choppedFullSizeRender 33
  • 2 hot Italian sausages, casings removed
  • 2 sweet Italian sausages, casings removed
  • 1 package sliced white or brown mushrooms
  • 1 red bell pepper, chopped
  • 4 cloves garlic, chopped
  • Salt + pepper
  • 3/4 cup of dry red wine
  • 1 jar of good quality marinara sauce (I typically use Rao’s)

Directions:

  • First, pour yourself a glass of wine. It’s Italian night!
  • It’s really important that you prep all of your ingredients before you start cooking as this sauce cooks quickly.
  • Heat 2 tablespoons olive oil in a large pot or dutch oven over medium-high heat.
  • Sauté onions until transparent and fragrant, about 5-7 minutes.FullSizeRender 31
  • Add sausage meat to onions and break apart with a wooden spoon.
  • Once sausage has browned, add mushrooms and stir constantly until they have released their juices, another 5 minutes or so.
  • Add bell pepper and garlic and cook for an additional 3-5 minutes then season with salt and pepper.
  • Carefully pour wine into pot and let reduce. It is VERY important that you take the time to let the sauce reduce until there is very little liquid left in the pot. If you skimp on this step you will be left with a looser sauce.
  • Add marinara sauce to the pot and stir to combine. Let simmer for at least 30 minutes to let the flavors develop.

TIPS

  • When cooking pasta it’s important to finish the cooking process in the sauce to “marry” the ingredients. Remove from the boiling water with a couple minutes to spare, add to a pot or pan with a serving of sauce, and let it cook on low heat for FullSizeRender 32another few minutes until al dente. I use spaghetti or a thicker noodle like bucatini.
  • Don’t forget the parmesan cheese 🙂
  • Modifications welcome! One time I made this with a chicken Italian sausage from Trader Joe’s instead of the typical pork version and it made for a much lighter sauce (yet also very delicious). Great for when you’re trying to eat lighter or during summer months.
  • My mom would use half ground beef and half sausage which also lightened up the flavor a bit. I prefer to use all sausage as I absolutely love the herbs and flavorings but it was a good option for kids or those that can’t handle the heat (it turns out SPICY!). Also using all sweet Italian sausage would work too.

Tasting Vietnam

I think the best thing you can do in life is travel and take in the world – whether it be exploring a new continent or making a 45-minute drive up the coast. I recently traveled to Asia for the first time and openly took in the culture shock. We chose to visit Vietnam as its tourism is growing but it’s still “off-the-beaten-path” and, well, we really like cheap Vietnamese food. It’s a country with a rich, complex history and its cuisine tells a story of similarity and separation. We started in Hanoi, spent a night in Halong Bay, explored Hoi An, and wrapped up the tour in Ho Chi Minh City. Each location offered a different style of flavor and dishes ranged from light broths to hearty, meaty sandwiches. I’m posting some of my favorite dishes here with the intention that one day I’m going to try to recreate them in my teeny American kitchen. Good luck to me….

Hanoi

IMG_2988

My mom commented that when she was my age the thought of ever visiting Hanoi was ludicrous. Perhaps similar to how we conceive Baghdad today? We’ll see. Anyway, it’s hard to describe Hanoi. It’s like old world French colonialism meets cold, rigid Communism. I was expecting big, bold flavors but instead we sampled a number of very mild yet fresh dishes. The pho we ate there was incredibly light and refreshing and actually made the perfect breakfast. There’s something great about starting the day with a warm bowl of soup. We ate a really yummy turmeric fish dish (Cha Ca) which I stupidly forgot to take a picture of. It’s essentially a white fish cooked with turmeric, and tons of herbs (specifically dill) in very hot oil table side and served on top of a bowl of rice noodles. My personal favorite thing we tried in Hanoi was actually a type of coffee… Egg Coffee.  A family friend recommended we seek it out and wow am I so happy we did! It’s essentially egg yolks whipped with sweetened condensed milk so it takes on a texture somewhere between a custard and marshmallow. It’s flavored with a splash of strong coffee and layered on top of a cup of brew and topped with powdered chocolate. Absolutely divine.

Hoi An

IMG_2991

This was where the magic food experience happened. Hoi An is a coastal town in Central Vietnam that is known for it’s textiles (cheapest tailored clothes you’ll find) and it’s FOOD. There’s plenty of street food both on the streets and in restaurants (I know… Is it really street food if it’s served in a restaurant?). We did our research and came across Ms. Vy’s restaurants and cooking school. We visited her famous restaurant Morning Glory and sampled a number of local dishes that were full of such a beautiful, simplistic flavor we couldn’t help but sign up for the cooking class to learn (and taste) more. Cao Lau was easily one of the best dishes we sampled… It’s a thicker style of rice noodle flavored with turmeric so they’re yellow. The noodles are mixed with a bit of broth (not a IMG_3011soup) and topped with pork, fresh herbs, peanuts, and crispy rice crackers. We also tried white rose dumplings and a variety of
spring rolls. At the cooking class we learned to make something called “Mother-in-law Soup” which was essentially a light
vegetable broth with a shrimp paste parcel and minced shrimp and veggies. It gets it’s name from the local tradition of newlywed wives satisfying their mother-in-laws by making this soup. We also IMG_3018made something call Banh Xeo which is a staple of Central Vietnamese cuisine and is essentially a rice flour pancake fried in oil until crispy. Delicious but ohhhh the oil! Lastly we made some barbecued chicken skewers and served them on top of a green mango salad (basically the same as papaya salad). Overall a wonderful and filling meal from start to finish and a fantastic thing to have experienced. Looking back on our stay in Hoi An I would have to say that the tastiest food we had by far was the barbecued pork we got on a street corner. We sat on little plastic chairs and a tray of various herbs, spicy peanut sauce, and rice paper was set in front of us. We were then served freshly grilled pork skewers (literally open flame in front of us on this street corner) which you then assembled into a wrap. So delicious, cheap, and memorable!

IMG_2995IMG_2996IMG_2997

Ho Chi Minh City

Our final stop… This city is very westernized yet it still has it’s charm. It was HOT yet I finally felt like I found some of the spice IMG_3032and flavor I was waiting for the whole trip. We visited the legendary Lunch Lady (made famous by Anthony Bourdain and for good reason). At little joints like hers you basically go sit down and they serve you whatever they felt like making that day… No need to order and don’t even try to guess what ingredients are in your food. We got Bun Bo Hue which was just epic to say the least. We had been searching for this noodle soup dish for the last week, expecting to find it in Hoi An since Hue is not too far
from that city. Let’s just say it was worth the wait. The broth is rich, sour, and spicy and served with chewy rice noodles and various meats (again, not sure what I ate exactly). I have looked up recipes since enjoying this dish and it looks pretty intense but I promise I will try to tackle it at some point! For now, here is a beautiful picture to remind me of that mouth-watering goodness…

Roasted Veggie Soup

I always make sure to have soup of some sort frozen in single portions in my freezer as they are super easy to defrost for a quick dinner aaaaand they’re healthy! This soup is particular easy to make and adapt based off of what’s in season. Since it’s winter this recipe includes a lot of root vegetables however it’s easy to switch it up and do different types of squash or potatoes.FullSizeRender 34

Here’s what you need:

  • 2 carrots, peeled and chopped into 1-inch pieces
  • 2 parsnips, peeled and chopped into 1-inch pieces
  • 2 turnips, peeled and chopped into 1-inch pieces
  • 2 fennel bulbs, thickly sliced
  • 2 garlic cloves, peeled and kept whole
  • Olive oil
  • 4 Tbs curry powder
  • Salt + pepper
  • 3-4 cups chicken stock, preferably homemade

Directions:

  • Preheat oven to 425 degrees
  • Coat veggies in olive oil and toss with curry powder and salt and pepper to taste
  • Place ingredients in a roasting pan and bake until tender (45 – 60 minutes)
  • Let veggies cool completely before moving to the next step
  • Place cooled veggies in a blender with 3 cups of the chicken stock and puree to a smooth consistency. Add additional chicken stock until the soup is at preferred thickness.
  • Transfer soup to a pot and reheat, letting the flavors come together again. Adjust seasonings to taste and serve hot.

TIPS:

  • I like to make the veggies the night before I want to make the soup so that they are already cooled and ready to puree the next night. Also this is a perfect way to transform leftover roasted vegetables from a dinner party!
  • If you want to make the soup silkier feel free to add a couple tablespoons of heavy cream at the very end. I personally don’t think this step is necessary but everyone has their own opinions.
  • Toppings! I like to top with toasted pumpkin seeds or croutons (whatever is on hand). Also a dollop of crème fraîche or sour cream would be lovely!

Homemade Chicken Stock

A fully stocked freezer is one of the most important things for a single foodie in the city (and arguably anyone anywhere). One thing I always make sure I have on hand is homemade chicken stock. I typically make a batch and use half in a soup which I freeze in single portions and then freeze the other half as is. You never know when you’re going to need some stock – whether it be the urge to make a quick homemade soup (I’m a sucker for matzoh ball) or when you come down with the flu and the only glimmer of hope in your life is having chicken broth on hand. My friends think I’m fancy when I mention making my own stock… I think they’re silly for not knowing how easy and cheap it is.

Here’s what you need:

  • Whole roaster 4-5 lb. chicken (Don’t get the most expensive, super organic/farm-raised/whatever chicken but also don’t get the cheapest. I typically go for a trustworthy organic brand)

    Throw it all in a pot and add water!

    Throw it all in a pot and add water!

  • 1 onion (unpeeled, quartered)
  • 2 carrots (unpeeled, quartered)
  • 2 celery stalks (untrimmed, quartered)
  • 6 garlic cloves (unpeeled)
  • Fresh herbs (Whatever I have on hand typically. Go light on the rosemary as it can overpower the stock. I love using thyme sprigs and parsley stalks. Try 8 thyme sprigs, 10 parsley sprigs, and one rosemary sprig)
  • 2 bay leaves
  • 1 tsp black peppercorns
  • 2 tsp kosher salt (I like to use minimal salt when making broth and add it later when I make soups)

Directions:

  • Combine all ingredients in a large stock pot and fill with water (about 2.5 quarts)
  • Bring to a boil then turn the heat down to low
  • After a couple minutes you will start to see scum forming around the edges. Take a spoon and remove this once (it won’t come back!)

    Get that scum!

    Get that scum!

  • After 3.5 hours or so (this is not an exact science) remove from the heat and strain the liquid into a clean container (I usually use another pot)
  • Set stock in the fridge overnight so that the fat solidifies and floats to the top. This step makes it so much easier to remove the fat however if you are in a time crunch you can use a baster and soak up the liquified fat after you strain it.

And now you have about 7-8 cups of chicken stock! That’s the equivalent to two of the boxed chicken stocks you buy from the store but much more delicious AND cheaper. It is very common that the stock turns out gelatinous. This is totally normal (freaked me out the first time though!) and comes from the natural gelatin that is released from the chicken bones.

TIPS:

  • If you are making a soup with chicken meat in it you can remove the chicken from the simmering liquid after about 45 minutes and cut the breast meat from the bone. Return the rest of the bones and dark meat to the stock for flavor. Don’t use the meat at the end of the process as literally all of the flavor has imparted from it
  • Try mixing things up! If you want to make an Asian soup replace the herbs with lemongrass, basil, cilantro, etc and thrown some chilis in there. Yum!